<?xml version="1.0" encoding="utf-8"?><feed xmlns="http://www.w3.org/2005/Atom" ><generator uri="https://jekyllrb.com/" version="4.4.1">Jekyll</generator><link href="https://matthewcardarelli.com/feed.xml" rel="self" type="application/atom+xml" /><link href="https://matthewcardarelli.com/" rel="alternate" type="text/html" /><updated>2025-10-22T17:26:46-04:00</updated><id>https://matthewcardarelli.com/feed.xml</id><title type="html">Matthew Cardarelli Solutions Blog</title><subtitle>This is the blog for Matthew Cardarelli Solutions. I wrangle the web so you can focus on what matters.</subtitle><author><name>Matthew Cardarelli</name></author><entry><title type="html">Client stories: A Roku App for the Disorder Channel</title><link href="https://matthewcardarelli.com/blog/client-stories/2025/09/25/disorder-channel-roku-app.html" rel="alternate" type="text/html" title="Client stories: A Roku App for the Disorder Channel" /><published>2025-09-25T00:00:00-04:00</published><updated>2025-09-25T18:43:00-04:00</updated><id>https://matthewcardarelli.com/blog/client-stories/2025/09/25/disorder-channel-roku-app</id><content type="html" xml:base="https://matthewcardarelli.com/blog/client-stories/2025/09/25/disorder-channel-roku-app.html"><![CDATA[<figure class="img-fullwidth">
<img is="click-to-view" src="/assets/img/blog/client-stories_disorder-channel_homescreen.jpg" />
<figcaption class="minor-content">The home screen of the Disorder Collection app allows users to browse or search the collection.</figcaption>
</figure>

<p>This may be the client story I am most proud of, to-date. I completed this project independently, from scratch, in a domain I in which I had no prior experience. More importantly, I got to work with a wonderful business  serving an underrepresented segment of the population.</p>

<p>Fortunately, this project did not require an NDA, so I can discuss it in great detail.</p>

<h2 id="the-situation">The situation</h2>

<!-- prettier-ignore-start -->
<p><a href="https://www.thedisordercollection.com/" target="_blank&quot;, rel=&quot;noopener noreferer">The Disorder Collection</a><!-- prettier-ignore-end -->
, a project of the Rare Outreach Coalition, has a curated library of over 250 films and video productions, produced by and for people living with rare diseases. This content used to be available on the popular Roku platform. However, on January 18th, 2024, Roku’s “Direct Publisher” service, which made channel creation as easy as copy-pasting a URL to a JSON feed, was officially sunset. Roku would now require all channels to build and publish their own app using the provided SDKs.</p>

<p>Unfortunately, this meant that the Disorder Collection was taken offline until an app could be developed to replace the old one. Given that Roku boasts over 81 million active users as of Q1 2024, the founders of the organization really wanted to restore their Roku channel and make their content available on the platform once again.</p>

<p>A former collegue and good friend of mine referred the founders to me.</p>

<h2 id="the-pitch">The pitch</h2>

<p>I offered to build a new Roku channel app and publish it to the app store. I would preserve any existing features the old app offered, and ensure that the app passed all of Roku’s required certification criteria for public channel apps.</p>

<p>As part of my initial discovery, I read a lot of official Roku developer documentation. This was critical to providing a more accurate time estimate, since I’d never done anything like this before. I ended up noting several sections of the certification criteria that appeared particularly relevant to include in the Scope of Work:</p>

<ul>
  <li>Performance (part 3)</li>
  <li>Channel operation (part 4)</li>
  <li>Deep linking (part 5)</li>
  <li>UI and graphics (part 6)</li>
</ul>

<p>Other criteria, such as requirements for advertisements, did not apply.</p>

<p>As always, I called out several risks in the proposal document, which I’ve copied here verbatim:</p>

<blockquote>
  <p><strong>Trust</strong>: Partnering with a new developer for the first time is inherently risky due to the high
degree of unknown. To mitigate this, I include a hassle-free cancellation policy in case you
decide I’m not the right person for the job. Additionally, I strive to demonstrate regular,
tangible progress towards the project objective in each of my work reports.</p>

  <p><strong>Lack of expertise</strong>: While I am a fast learner, Roku TV development is not one of my areas of
specialization. The pace of my work will be slower than usual, and the complexity of the
work I can deliver will be lower. To compensate, I will apply a discount to the total project
price to reflect my reduced efficiency, and I will stretch my estimated timeline to incorporate
my learning curve.</p>

  <p><strong>Security</strong>: Working with a third-party developer requires granting them access to sensitive
information, and authorizing them to make changes to your accounts. To protect your
organization, I advocate for a “zero-trust” security policy. I will research the Roku platform
and walk you through the steps needed to grant me the minimal access necessary for me to
deliver the completed project to you.</p>
</blockquote>

<h2 id="project-highlights">Project highlights</h2>

<h3 id="client-ownership">Client ownership</h3>

<p>It’s important from a security and legal standpoint to ensure that clients maintain control of their own IP. For that reason, I walked the client’s point of contact (one of the founders) through the process of setting up a Roku developer account, creating the channel profile, and inviting me to collaborate as a user with limited privileges. This took slightly longer than me setting everything up myself, but by following the principle of least privilege, the client maintained ultimate control and responsibility over the channel.</p>

<h3 id="learning-a-new-stack">Learning a new stack</h3>

<p>Roku channel apps are built using two proprietary languages. SceneGraph is a flavor of XML used to declaratively create and compose UI components; BrightScript is a scripting language that seems to borrow from several other languages, and integrates heavily with SceneGraph.</p>

<p>One challenge I hadn’t foreseen was the relative lack of sample code and tutorials I would find while developing with Roku’s special purpose tools. This was a stark contrast to the open, general purpose, widely adopted programming languages I typically use. Roku’s official documentation had a lot of the information I needed, but it is not particularly easy to navigate. There were some official example apps published on Roku’s GitHub, but many of these lacked explanations for why things worked. And the developer’s forum was something of a ghost town - many recent questions were simply left unanswered.</p>

<p>To compensate, I made heavy use of intelligent trial and error. When something wasn’t working, I would strategically disable blocks of code one at a time, in a process of elimination that usually allowed me to determine which piece of logic was causing a problem. I also made good use of the built-in debugging endpoint on my development Roku device, which I could access from my laptop via the arcane <code class="language-plaintext highlighter-rouge">telnet</code> command.</p>

<h3 id="iterative-development">Iterative development</h3>

<p>My inexperience with Roku development meant that even relatively mundane tasks, such as loading the feed and rendering a grid of shows, felt insurmountable at first. On a web app, these would be a breeze for me to whip up. In this brand new environment, often times I felt stuck not knowing where to start.</p>

<p>To remedy this situation, I broke up each feature into the smallest set of tasks I could. For example, loading a grid of shows and browsing was implemented like this:</p>

<ul>
  <li>Fetch the feed via HTTP.</li>
  <li>Render one show title to the screen.</li>
  <li>Render one show thumbnail to the screen.</li>
  <li>Render one row of title + thumbnail elements.</li>
  <li>Validate the successful capture of any remote control button press.</li>
  <li>Bring focus to the grid and test left-right button presses to scroll the row.</li>
  <li>Fix the layout and styling of the titles and thumbnails.</li>
</ul>

<p>I would commit to version control any time I got a task working. This helped me focus on learning one app function at a time, and avoid being overwhelmed.</p>

<p>Once users could select a movie and start playback, I took advantage of the “Beta app” feature of the Roku developer dashboard. This lets devs upload a bundled app and then share a private code to others so they can test the app out. I started publishing new versions of the Beta app each time I completed a feature, so that my point of contact could try it on their own device. This was especially important because I could not easily produce screen capture videos like I can for the web apps I build on my laptop.</p>

<h3 id="ui-design">UI design</h3>

<figure class="img-fullwidth">
<img is="click-to-view" src="/assets/img/blog/client-stories_disorder-channel_infoscreen.jpg" />
<figcaption class="minor-content">The info screen uses a black gradient on the left to hide the background image and overlay with the title, description, and play buttons.</figcaption>
</figure>

<p>I am not a UX designer. I make that clear to every client I contract with. That said, since I build a lot of user interfaces, some amount of design work is inevitable.</p>

<p>In this case, I didn’t have any access to the prior app to draw from, nor did I have any experience building interfaces for television apps. The pre-built components in the SDKs did a lot of heavy lifting, thankfully. But there were still layout and interaction decisions I needed to make. My approach? Mimicry.</p>

<p>I booted up my smart TV, and explored several of the popular streaming apps we have installed in our house. I took some notes on how they approached grid views and show summary screens, and search pages, since those were the major features I was developing. The result is, in my opinion, nothing that will win any awards, but good enough to not feel too jarring when users jump from a more popular app into this one.</p>

<p>I think I’m most proud of the show info screen. It took a lot of experimentation to find the spacing and font sizes that felt the most natural and readable. Plus, I had fun adding the gradient effect!</p>

<h3 id="solving-trick-play-thumbnails">Solving trick play thumbnails</h3>

<p>The biggest hurdle I faced in terms of achieving certification was implementing something called “trick play thumbnails.” These are Roku’s name for the small preview images that appear above the playback controls when you seek forward or backward. What initially seems like a simple feature turned out to require a lot of research and problem solving.</p>

<h4 id="a-primer-on-streaming-video">A primer on streaming video</h4>

<p>In order to understand the challenge here, we need some background knowledge about how video files work. This was all knowledge I had to teach myself while working on this project.</p>

<p>Raw video files are very large, because they are essentially a giant collection of images. This is especially true when you get to higher resolutions such as 4K. In order to shrink the size of the file, we typically compress all the still images in a video file for storage, and then decompress them during playback. The algorithm used for compression and decompression is called a “codec”. H.264, also known as Advanced Video Coding (AVC), is one of the most popular video codecs.</p>

<p>Of course, a video file typically contains more than just an image stream. Most videos also include audio streams, and many also contain metadata, such as the movie title, publication date, genre, and more. A video “container” format specifies a way to store compressed video and audio together with metadata. The ubiquitous “MP4” file format that most people know is in fact a video container format.</p>

<p>A single large file with a fixed resolution may be fine for videos saved to play offline on your device. But what about videos streamed from a server to many different devices? In that case, we need more flexibility. An old smartphone on a shaky mobile connection will require a lower-resolution stream than a brand-new 4K smart TV with a Gigabit WiFi connection. To enable adaptive streaming, we use streaming protocols such as HTTP Live-Streaming (HLS). HLS helps devices gather the information they need to stream, by defining two new file types:</p>

<ul>
  <li>A “Master Playlist” file, which contains URLs pointing to multiple variants of a video, typically at different resolutions. The device consuming the stream can choose a variant from this list and follow the link to download…</li>
  <li>A “Playlist” file, which contains URLs pointing to all of the “media segment” files for a specific variant of the video, arranged in order.</li>
</ul>

<p>Each segment file contains the compressed images for a small portion of the full video. The streaming device reads the Playlist file to fetch each segment, one after the other, and plays them in sequence. The advantage of using tiny segment files is that the streaming device can start playing the first segments without waiting for the entire video to download.</p>

<h4 id="implementation">Implementation</h4>

<figure class="img-fullwidth">
<img is="click-to-view" src="/assets/img/blog/client-stories_disorder-channel_trickplay.jpg" />
<figcaption class="minor-content">Trick play thumbnails appear as a carousel of images above the seek bar and play controls. They cycle through as the user moves the play cursor around.</figcaption>
</figure>

<p>Remember, trick play thumbnails are small preview images that we show when a user is navigating to a new point in a show. Roku gives us two options for adding these preview images to our streaming content:</p>

<ol>
  <li>Generate standard thumbnail files and upload them to a file host. Then, update the HLS master playlists for each video to include the download URL from the host. The Roku device will automatically discover this URL and download the trick play thumbnails.</li>
  <li>Generate thumbnails in a format called “BIF” and upload them to a file host. Then, add some code to our Roku app so that it knows how to fetch the trick play thumbnails for each video.</li>
</ol>

<p>The first problem was a big one; the HLS Master Playlist files for each show on the Disorder Channel were being generated and hosted on Vimeo. I had no way to modify these files, so option (1) was immediately eliminated. Option (2) it was!</p>

<p>The second problem was that the executable tool Roku provided for generating BIF tools on linux had not been updated in six years! This wasn’t a problem on its own, but the executable depended on a dynamic link to an old version of a shared library that was no longer available on any modern Linux distribution. After banging my head on my keyboard for a couple days, I had an idea; I could pull a container image for an older version of my linux distribution, one that still had the old library version, and that should allow me to execute the outdated BIF generator. With just a couple quick hacks, this worked like a charm. I ended up open-sourcing the Containerfile and Readme for this <!-- prettier-ignore-start --><a href="https://scm.matthewcardarelli.com/matthewcardarelli/bif_container" target="_blank&quot;, rel=&quot;noopener noreferer">BIF Container</a><!-- prettier-ignore-end -->
, which you are welcome to view yourself.</p>

<p>The third problem called for some DevOps. The client did not have any infrastructure set up, which meant nowhere to upload and host the trick play thumbnail files. I ended up creating a team for them on Digital Ocean, and uploading the files to a Spaced bucket there. I made this decision after running a cost comparison of several different S3-compatible hosting providers, including AWS and Google Cloud.</p>

<p>You can be sure that I was thrilled when I finally got this solution working end-to-end!</p>

<h2 id="area-of-improvement-keep-the-ball-rolling">Area of improvement: Keep the ball rolling</h2>

<p>My client was, understandably, very busy. This meant that sometimes weeks would pass before I would hear back from them. As someone who thrives in an environment of fast-paced iteration and feedback loops, it was frustrating to feel my momentum stalling.</p>

<p>Later into the project,  I started reaching out to offer possible paths forward that did not require their input, with an explanation of the trade-offs compared to having them more engaged. One example was setting up the S3 bucket; originally, I had asked them for a bunch of viewer metrics so that I could estimate bandwidth use as a factor in my cost analysis; it turned out that they preferred me to simply make a best guess and continue towards the goal of publishing the app, even if it meant they might pay a bit extra in hosting costs.</p>

<p>In the future, I’m going to proactively prompt my busier clients to make conscious choices about whether they want to engage or let me use my own judgment.</p>

<h2 id="final-takeaway">Final takeaway</h2>

<p>With this project, I really proved to myself that I am achieving my freelance aspirations; managing projects and clients independently, teaching myself entirely new skill-sets on the job, and choosing to work with clients whose missions I believe in.</p>

<!-- prettier-ignore-start -->
<p><a href="https://channelstore.roku.com/details/183ad9c6d9d7d6c7b94d9f42b50962a2:5ac8ba7bc16e93ada678a1cfa17c9712/the-disorder-channel" target="_blank&quot;, rel=&quot;noopener noreferer">The Disorder Channel</a><!-- prettier-ignore-end -->
 is available on the Roku app store. If you have a Roku device, please give it a look!</p>]]></content><author><name>Matthew Cardarelli</name></author><category term="blog" /><category term="client-stories" /><summary type="html"><![CDATA[]]></summary></entry><entry><title type="html">A gentle introduction to 1s and 0s</title><link href="https://matthewcardarelli.com/blog/data-ownership-guide/2025/07/25/part-1-gentle-intro-to-1s-and-0s.html" rel="alternate" type="text/html" title="A gentle introduction to 1s and 0s" /><published>2025-07-25T00:00:00-04:00</published><updated>2025-07-29T14:34:00-04:00</updated><id>https://matthewcardarelli.com/blog/data-ownership-guide/2025/07/25/part-1-gentle-intro-to-1s-and-0s</id><content type="html" xml:base="https://matthewcardarelli.com/blog/data-ownership-guide/2025/07/25/part-1-gentle-intro-to-1s-and-0s.html"><![CDATA[<h2 id="the-modern-internet-is-brutal">The modern internet is brutal</h2>

<p>It’s 2025. The internet has converged to a single video platform, one search engine, and a few social media giants, surrounded by heaps of ads and propaganda. AI companies have consumed every shred of data the could find in pursuit of automating away not just tedious tasks, but acts of human ingenuity and creativity. Meanwhile, software is leased like college town apartments, and your files are stored hundreds of miles away in the bowels some corporate data center in the cloud.</p>

<p>What’s an exhausted small business owner or distressed digital citizen to do? Does it have to be this way? Where did we go wrong? Are we stuck in this digital hell forever?</p>

<p>No, we aren’t.</p>

<h2 id="the-big-myth">The big myth</h2>

<p>Companies like Microsoft, Google, Amazon, Apple, and the other tech giants benefit from a prevailing myth: <strong>that technology is too hard for the average person to understand, thus big businesses must swoop in and save us from ourselves</strong>. After all, they have the expertise and the capital to pay people lots of money to build fancy apps that conceal all the complexity of our computers and smartphones, saving us priceless time and effort. Handling your own data in 2025 isn’t just foolish; if you run a business, it’s fiscally irresponsible!</p>

<p><em>…or is that just what they want you to think?</em></p>

<p>Look, I don’t want to pretend that the math, science, and engineering underpinning modern technology are simple. They aren’t. But that’s okay. I don’t understand the intricacies of an internal combustion engine, or a convection oven, but I’m a pretty good driver, and I can bake some decent banana muffins. So, where does this myth come from?</p>

<p>Perhaps, it’s the fault of the big companies themselves? You know, the ones who have a vested financial interest in locking people onto their platforms so they can charge them large sums of money once they’re trapped? The ones who’ve <!-- prettier-ignore-start --><a href="https://www.pcmag.com/news/apple-lobbies-against-right-to-repair-bill-in-oregon" target="_blank&quot;, rel=&quot;noopener noreferer">lobbied time and time again against Right to Repair bills</a><!-- prettier-ignore-end -->
, to the point that people are afraid to open up their own hardware to learn how it works?</p>

<p>Yes, building computers and programming software can be very complicated. But managing your data? That’s really not so bad. All you need is a basic understanding of what digital information is, and how computers work with it. This knowledge will open a door to a whole new world of digital freedom and autonomy.</p>

<p>My goal for this blog post series is to help as many people as possible understand the very basics of digital data. Armed with this knowledge, you can make more informed decisions about who gets to access your data, as well as when and how.</p>

<h2 id="our-first-step-lets-encode-some-data">Our first step: let’s encode some data!</h2>

<p>The foundation of all modern computing (for now, while we’re ignoring quantum computing) is the simplest of ideas: the <strong>bit</strong>. This is where you’d expect me to define a bit. But that won’t help you learn. Instead, let’s <em>discover it</em>.</p>

<p>Imagine you’re making a list of tasks; perhaps a list of chores to complete around the house. You need some way to track which tasks you’ve completed, and which you haven’t done yet. If you’re writing your list down on paper, you add a checkbox (☐) beside each task. Then, when you complete that task, you’ll add a checkmark (🗹) inside to mark it as done.</p>

<p>This remarkably simple system we’ve invented is an example of an <strong>encoding</strong>. Encodings are mappings from one set of symbols to another. A good way to think of them is like a secret code; the encoded symbols only make sense to someone who understands their intended meaning.</p>

<p>It’s usually helpful to look at an encoding in a table format, as shown below:</p>

<table class="encoding">
  <tbody>
    <tr><td>☐</td><td>To Do</td></tr>
    <tr><td>🗹</td><td>Done</td></tr>
  </tbody>
  <caption class="minor-content">Mapping visual symbols to a task's possible completion states.</caption>
</table>

<p>While we’re at it, let’s find some other uses for our checkboxes, by creating additional encodings:</p>

<div class="row-of-tables">
  <table class="encoding">
    <tbody>
      <tr><td>☐</td><td>No</td></tr>
      <tr><td>🗹</td><td>Yes</td></tr>
    </tbody>
  </table>

  <table class="encoding">
    <tbody>
      <tr><td>☐</td><td>False</td></tr>
      <tr><td>🗹</td><td>True</td></tr>
    </tbody>
  </table>

  <table class="encoding">
    <tbody>
      <tr><td>☐</td><td>Off</td></tr>
      <tr><td>🗹</td><td>On</td></tr>
    </tbody>
  </table>
</div>

<p>Hey, these little checkboxes are actually pretty versatile! It turns out that there’s a lot of information that we can encode using just one pair of symbols. We call these kinds of encodings <strong>binary encodings</strong> (binary meaning “two”). Our little two-state checkbox is our <strong>bit</strong> of information. There’s nothing magical or particularly complicated about bits or binary systems. In fact, we communicate using binaries all the time in our daily life, when we give a head nod or a head shake, or when we flash a thumbs up or a thumbs down.</p>

<p>Now, if I just showed you a checkbox with or without a checkmark, and asked you what it meant, you might guess at one of the above encodings. But without being sure, the checkbox can’t provide you with any useful information. That’s because you need to know both the encoding <em>and its context</em> to actually use the information. The importance of context arises in our daily life examples too. For instance, a head shake might mean “no, don’t do that” or “no, I don’t mind” depending on the words that follow the gesture.</p>

<p>The bit is the foundation of all digital technology today. This is due to the fact that we have, over the past several decades, discovered and engineered extremely efficient and reliable techniques for storing and transmitting bits using electricity. The math and science behind digital electronics and hardware is a whole separate field of study, which I am completely unqualified to explain. Thankfully, we’re studying for our data driver’s license here, not to become a mechanic or auto engineer, so we can move on, trusting that our devices can handle bits properly.</p>

<h2 id="adding-another-bit">Adding another bit</h2>

<p>How far can we stretch our checkbox system? Could we encode something even more useful, like numbers? Let’s try!</p>

<table class="encoding">
  <tbody>
    <tr><td>☐</td><td>0</td></tr>
    <tr><td>🗹</td><td>1</td></tr>
  </tbody>
  <caption class="minor-content">Encoding numbers with a single checkbox.</caption>
</table>

<p>Better than nothing, I guess? I think we’ve hit the limits of what we can do with a single checkbox though. If we want to encode larger numbers, we need additional checkboxes.</p>

<table class="encoding">
  <tbody>
    <tr><td>☐☐☐</td><td>0</td></tr>
    <tr><td>☐☐🗹</td><td>1</td></tr>
    <tr><td>☐🗹🗹</td><td>2</td></tr>
    <tr><td>🗹🗹🗹</td><td>3</td></tr>
  </tbody>
  <caption class="minor-content">Counting by checkmarks.</caption>
</table>

<p>There’s some problems with the method above. First of all, we’re going to need lots and lots of checkboxes if we want to represent large numbers. Plus, we’re not using all the possible combinations of checkbox states. See what I mean?</p>

<table class="encoding">
  <tbody>
    <tr><td>☐☐☐☐<wbr />☐☐☐☐<wbr />☐☐☐☐<wbr />☐☐☐☐</td><td>0</td></tr>
    <tr><td>☐☐☐☐<wbr />☐☐☐☐<wbr />☐☐☐☐<wbr />☐☐☐🗹</td><td>1</td></tr>
    <tr><td>☐☐☐☐<wbr />☐☐☐☐<wbr />☐☐☐☐<wbr />☐☐🗹🗹</td><td>2</td></tr>
    <tr><td>☐☐☐☐<wbr />☐☐☐☐<wbr />☐☐☐☐<wbr />☐🗹🗹🗹</td><td>3</td></tr>
    <tr><td>🗹🗹🗹🗹<wbr />🗹🗹🗹🗹<wbr />🗹🗹🗹🗹<wbr />🗹🗹🗹🗹</td><td>16</td></tr>
    <tr><td>☐☐☐☐<wbr />☐☐☐☐<wbr />☐☐☐🗹<wbr />🗹🗹☐☐</td><td>(unused)</td></tr>
    <tr><td>☐🗹☐🗹<wbr />☐☐☐☐<wbr />☐☐☐☐<wbr />☐☐☐☐</td><td>(unused)</td></tr>
  </tbody>
  <caption class="minor-content">Exposing the inefficiencies of our encoding.</caption>
</table>

<p>Let’s go back to the drawing board and try a different system. Instead of assigning each checkmark a value of 1, we will assign each checkbox a power of two, then add up all the powers of two that are checked off to determine the encoded number.</p>

<table class="encoding">
  <tbody>
    <tr><td>☐☐</td><td></td><td>0+0</td><td>0</td></tr>
    <tr><td>☐🗹</td><td>&nbsp;&nbsp;&nbsp;2<sup>0</sup></td><td>0+1</td><td>1</td></tr>
    <tr><td>🗹☐</td><td>2<sup>1</sup>  </td><td>2+0</td><td>2</td></tr>
    <tr><td>🗹🗹</td><td>2<sup>1</sup>+2<sup>0</sup></td><td>2+1</td><td>3</td></tr>
  </tbody>
  <caption class="minor-content">Assigning checkboxes to powers of two.</caption>
</table>

<p>This is definitely a bit harder to read, but there are some notable improvements. We only needed two checkboxes to count to three, instead of three boxes. And, we’re using all the possible combinations of two checkboxes to get there, which is much more efficient. How much more efficient? Check out the difference encoding the number 30 using our first method, versus our second:</p>

<table class="encoding">
  <tbody>
    <tr>
      <td>🗹🗹🗹🗹🗹<wbr />🗹🗹🗹🗹🗹<wbr />🗹🗹🗹🗹🗹<wbr />🗹🗹🗹🗹🗹<wbr />🗹🗹🗹🗹🗹<wbr />🗹🗹🗹🗹🗹</td>
      <td></td>
      <td>1×30</td>
      <td>30</td>
    </tr>
    <tr>
      <td>🗹🗹🗹🗹☐</td>
      <td>2<sup>4</sup><wbr />+2<sup>3</sup><wbr />+2<sup>2</sup><wbr />+2<sup>1</sup></td>
      <td>16<wbr />+8<wbr />+4<wbr />+2</td>
      <td>30</td>
    </tr>
  </tbody>
  <caption class="minor-content">Assigning checkboxes to powers of two.</caption>
</table>

<p>If you’re starting to get lost, don’t worry! This is all you need to takeaway:</p>

<ul>
  <li>With enough bits, we can encode <em>any whole number</em> we can think of.</li>
  <li>By treating our bits as “base-2” digits, we can encode numbers very efficiently.</li>
</ul>

<p>For convenience, the rest of this article will refer to bits using the standard <code>0</code> and <code>1</code> symbols instead of our checkbox and checkmark symbols. If you get confused, just imagine them as checkboxes again, and remind yourself what meaning each checkbox has been assigned in each context.</p>

<h2 id="with-bits-all-data-is-possible">With bits, all data is possible</h2>

<p>The ability to encode numbers in bits unlocks a whole new world for us. Now, we can map any data we’d like to numbers, and then map those numbers to bits! Let’s try some examples.</p>

<h3 id="encoding-text">Encoding text</h3>

<p>Text is one of the most common categories of information humans want to share. Let’s start with the simplest possible example, by encoding the letters “A”, “B”, “C”, and “D”.</p>

<table class="encoding">
  <thead>
    <tr>
      <th>Bin</th>
      <th>Num</th>
      <th>Text</th>
    </tr>
  </thead>
  <tbody>
    <tr><td>00</td><td>0</td><td>A</td></tr>
    <tr><td>01</td><td>1</td><td>B</td></tr>
    <tr><td>10</td><td>2</td><td>C</td></tr>
    <tr><td>11</td><td>3</td><td>D</td></tr>
  </tbody>
  <caption class="minor-content">Mapping letters to bits.</caption>
</table>

<p>If we add more bits, we could expand the set of characters in our encoding to encompass letters, punctuation marks, and more! Note that we would also need separate codes for lowercase vs. uppercase letters, and for textual representations of the digits 0-9. Plus, there are “hidden” characters such as spaces between words, and the transitional space from the end of one line to the start of the next.</p>

<p>If you want to study an example of a real text encoding, take a look at the <!-- prettier-ignore-start --><a href="https://www.ascii-code.com/" target="_blank&quot;, rel=&quot;noopener noreferer">ASCII encoding table</a><!-- prettier-ignore-end -->
.</p>

<h3 id="encoding-color">Encoding color</h3>

<p>Most of us interact with our devices visually through a display, where we can create and enjoy rich image and video content. In order to do that, computers must encode information about what colors to show on each pixel of the screen. Let’s invent rudimentary color encoding right now, using just three bits, one for each primary color:</p>

<table class="encoding">
   <thead>
    <tr>
      <th>Bin</th>
      <th>Num</th>
      <th colspan="3">Encoding</th>
      <th>Color</th>
    </tr>
  </thead> 
  <tbody>
    <tr><td>000</td><td>0</td><td>  </td><td>  </td><td>  </td><td>⬛ Black</td></tr>
    <tr><td>001</td><td>1</td><td>  </td><td>  </td><td>🟦</td><td>🟦 Blue</td></tr>
    <tr><td>010</td><td>2</td><td>  </td><td>🟨</td><td>  </td><td>🟨 Yellow</td></tr>
    <tr><td>011</td><td>3</td><td>  </td><td>🟨</td><td>🟦</td><td>🟩 Green</td></tr>
    <tr><td>100</td><td>4</td><td>🟥</td><td>  </td><td>  </td><td>🟥 Red</td></tr>
    <tr><td>101</td><td>5</td><td>🟥</td><td>  </td><td>🟦</td><td>🟪 Purple</td></tr>
    <tr><td>110</td><td>6</td><td>🟥</td><td>🟨</td><td>  </td><td>🟧 Orange</td></tr>
    <tr><td>111</td><td>7</td><td>🟥</td><td>🟨</td><td>🟦</td><td>⬜ White</td></tr>
  </tbody>
  <caption class="minor-content">Mapping primary colors to bits.</caption>
</table>

<p>Now, imagine if we took lots of three-bit groups, and we arranged them in a grid:</p>

<div class="row-of-tables">
  <table class="encoding">
    <thead>
      <tr>
        <th></th>
        <th colspan="3">X</th>
      </tr>
    </thead> 
    <tbody>
      <tr><th rowspan="4">Y</th></tr>
      <tr><td>001</td><td>011</td><td>010</td></tr>
      <tr><td>011</td><td>010</td><td>110</td></tr>
      <tr><td>010</td><td>110</td><td>100</td></tr>
    </tbody>
    <caption class="minor-content">Our arrangement in bits.</caption>
  </table>
  <table class="encoding">
    <thead>
      <tr>
        <th></th>
        <th colspan="3">X</th>
      </tr>
    </thead> 
    <tbody>
      <tr><th rowspan="4">Y</th></tr>
      <tr><td>🟦</td><td>🟩</td><td>🟨</td></tr>
      <tr><td>🟩</td><td>🟨</td><td>🟧</td></tr>
      <tr><td>🟨</td><td>🟧</td><td>🟥</td></tr>
    </tbody>
    <caption class="minor-content">Our arrangement in colors.</caption>
  </table>
</div>

<p>We’ve just reinvented the concept of a <em>bitmap</em>, the technology that forms the basis of many of your favorite image file formats, such as JPEG, PNG and the (in)famous GIF. Of course, real color encodings use groups of bits for each color channel, in order to capture various shades and hues.</p>

<h3 id="encoding-instructions">Encoding instructions</h3>

<p>Our computers need more than data to operate; they need instructions that tell them what we want done to our data. Fortunately, we can encode a set of instructions just as easily as text or colors:</p>

<table class="encoding">
  <thead>
    <tr>
      <th>Bin</th>
      <th>Num</th>
      <th>Operation</th>
    </tr>
  </thead>
  <tbody>
    <tr><td>00</td><td>0</td><td>+</td></tr>
    <tr><td>01</td><td>1</td><td>-</td></tr>
    <tr><td>10</td><td>2</td><td>×</td></tr>
    <tr><td>11</td><td>3</td><td>÷</td></tr>
  </tbody>
  <caption class="minor-content">Mapping letters to mathematical operations.</caption>
</table>

<p>Once we have these binary-encoded instructions, we can combine them with our binary-encoded data to perform transformations.</p>

<p>If you’ve ever downloaded and installed a file, you may have been baffled when the download website presented you a choice between several versions, all with horribly confusing names like “x86-64”, “amd64”, “arm”, and “i386”. These labels correspond to the various instruction sets used by different CPUs. To put it plainly, they’re all encodings used to map bits to computer instructions. If you install a program encoded to an instruction set that your computer can’t understand, it won’t be able to run the program at all.</p>

<h3 id="sidebar-whats-a-byte">Sidebar: What’s a byte?</h3>

<p>A byte is eight bits. That’s it. Working with multiples of eight bits turns out to be really useful in computing. If you want to know more, look it up!</p>

<h2 id="takeaway-not-all-encodings-are-created-equal">Takeaway: Not all encodings are created equal</h2>

<p>Now that we understand bits and binary encodings, we can manage our data more strategically. Just from what we learned above, we can deduce that the binary encoding we choose to store our data in (commonly called the “file format”) can make a huge difference in our ability to own and control our data. For example:</p>

<ul>
  <li>A file format that offers compression means we can store more data in the same amount of storage space, at the cost of lower quality. For example, a JPEG image takes up less space than a PNG.</li>
  <li>A file format whose encoding rules (called the “specification”) are publicly available and free to use will often have more applications built that can understand it. For example, the ubiquitous CSV file that almost all web apps allow for import and export. Also consider the PDF, which literally stands for “Portable Document Format.”</li>
</ul>

<p>Take a moment next time you’re opening, saving, sending, or downloading a file. Make note of it’s file type, and ask yourself what you know about it. If you’re curious, look up its history or, if you’re feeling really brave, try to find it’s file specification and read the introductory section where they describe its intended purpose.</p>

<h2 id="okay-now-what">Okay, now what?</h2>

<p>Hopefully, you found this article informative on it’s own. But don’t worry, there’s a purpose to our intellectual pursuits. In the next entry to this series, I’ll build off the foundation we just established, and share my own strategy for data ownership, with recommendations for small businesses, artists, and everyday users.</p>

<link rel="stylesheet" href="/assets/css/pages/blog/part-1-gentle-intro-to-1s-and-0s.css" />]]></content><author><name>Matthew Cardarelli</name></author><category term="blog" /><category term="data-ownership-guide" /><summary type="html"><![CDATA[]]></summary></entry><entry><title type="html">Client stories: An S3 File Uploader in Python</title><link href="https://matthewcardarelli.com/blog/client-stories/2025/02/27/s3-python-uploader.html" rel="alternate" type="text/html" title="Client stories: An S3 File Uploader in Python" /><published>2025-02-27T00:00:00-05:00</published><updated>2025-02-27T00:00:00-05:00</updated><id>https://matthewcardarelli.com/blog/client-stories/2025/02/27/s3-python-uploader</id><content type="html" xml:base="https://matthewcardarelli.com/blog/client-stories/2025/02/27/s3-python-uploader.html"><![CDATA[<p>In this client story, I help a tech startup efficiently upload large volumes of small files from their IoT devices to an AWS S3 bucket. It’s been several months since I completed this project, so my memory may be a bit fuzzy on details. This client has requested anonymity, so I’ll be speaking in very general terms about the business objectives.</p>

<h2 id="the-situation">The situation</h2>

<p>A former colleague of mine reached out regarding an contracting opportunity with a startup. Part of their technology solutions involve training machine learning models using data they collect from IoT devices deployed on their customers’ premises. In true startup fashion, they had initially “solved” the problem of data ingestion by installing a commercial cloud storage client on their devices and saving all their data to this folder, letting the sync client do the work. This let them get to market quickly, but was not scaling well as their data volume quickly grew.</p>

<p>They needed to implement a more scalable data pipeline better suited to high throughput, low latency ingestion of small files, and easier data access for analytics and machine learning application. All of this needed to be setup within their existing AWS account.</p>

<h2 id="the-pitch">The pitch</h2>

<p>My original pitch was to author a technical design document proposing an architecture for their data pipeline and warehousing, starting with an analysis of their business domain and data model, followed by a complete system architecture, security model, component design decisions, infrastructure, and development roadmap.</p>

<p>The client accepted this pitch, and I did work on the document for a while. However, it became clear to both of us early on that a fast-paced startup like this one couldn’t afford a waterfall approach. So, I proposed a pivot to incrementally developing the components of the data pipeline, in order of urgency. Their top priority was the data ingestion component, since cleaning and processing could be done at any time once the data was stored.</p>

<h2 id="project-highlights">Project highlights</h2>

<p>While I had experience with python, data engineering was relatively new to me aside from <a href="/blog/client-stories/2024/04/05/every-voice-legislation-pipeline.html">the pipeline I build for Every Voice</a>. I had to self-educate on the job, especially with regards to concurrecy and parallel processing in Python.</p>

<h3 id="system-architecture">System architecture</h3>

<figure class="img-fullwidth">
<img is="click-to-view" src="/assets/img/blog/client-stories_s3-uploader-service-pipeline-architecture.jpg" />
<figcaption class="minor-content">A high-level diagram of the S3 file uploader service. Tasks are sent to the service via a multiprocess queue, then pulled from the queue into a buffer. The buffer submits tasks to the worker pool, while discarding low priority tasks if needed to ensure it can prevent the queue from filling up. The worker threads make HTTPS requests to AWS to upload the files to S3.</figcaption>
</figure>

<p>It took several iterations to land on an appropriate architecture for the uploader component, due to challenges meeting the operational requirements and constraints. In particular, the upload service:</p>

<ol>
  <li>Must not block the program’s main application loop, since this is the IoT device’s primary job.</li>
  <li>Should not consume unnecessary device CPU or memory resources, as the main application loop needs as much as possible.</li>
  <li>Should be fault-tolerant and lossless with respect to device shutdowns and unstable network connections.</li>
  <li>Should require minimal authorizations to access AWS resources from the client’s account, to prevent abuse if the device is compromised.</li>
</ol>

<p>
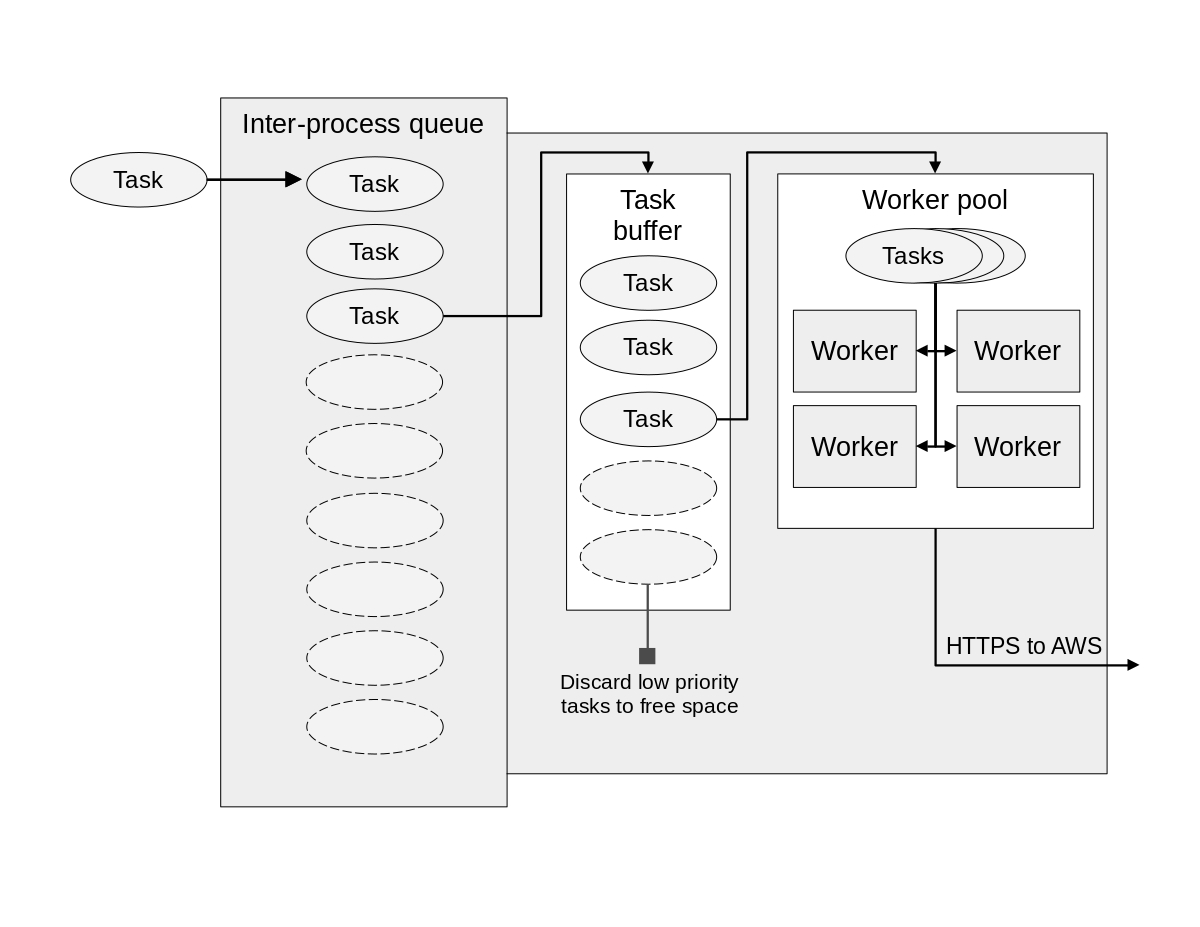
To satisfy the first constraint, the uploader service runs in a separate Python process, using the <code class="language-plaintext highlighter-rouge">multiprocessing</code> library. The main application passes file upload tasks to the uploader service via an <strong>inter-process queue</strong>. The uploader process then pulls tasks from the queue to execute them.</p>

<p>In designing and implementing this system, I adhered to the time-honored UNIX philosophy of “Do one thing well.” Each component has a single primary responsibility, which simplified the test-driven development approach that guided my implementation.</p>

<p>The core of the uploader service is the <strong>upload loop</strong> which executes three steps on repeat:</p>

<ol>
  <li>Pull a task from the queue into the task buffer.</li>
  <li>Filter out low-priority tasks from the buffer.</li>
  <li>Submit a task to the worker pool.</li>
</ol>

<p>It will help to go through these one at a time.</p>

<h4 id="pull-a-task-from-the-queue">Pull a task from the queue</h4>

<p>During the first step of each cycle of the process loop, the uploader pulls a task from the queue and adds it to the task buffer. Tasks leave the queue in the order they are added (First-in, First-out). If the task buffer is empty, the program will wait at this step (also known as “blocking”) until there’s a task to retreive, since there’s no other work to be done.</p>

<p>The main application writes files to the local device before submitting an upload task to the queue. This way, if a task fails to upload due to an unexpected shutdown or other issue, the file can be discovered and uploaded the next time the device boots.</p>

<p>The <strong>task buffer</strong> is nothing special; it’s a simple ordered list stored in uploader process memory. The buffer prevents the interprocess queue from filling up, without discarding important tasks, thanks to step two…</p>

<h4 id="filter-the-task-buffer">Filter the task buffer</h4>

<p>If the task buffer is full, the second step of the process loop may discard some tasks to make room for more. This way, the uploader can always take a new task from the queue, which means the queue should never reach its capacity. This is important, because a full interprocess queue would prevent the main app from adding more tasks.</p>

<p>Every file upload task send to the uploader has a “priority” property set to one of three levels, “LOW”, “MEDIUM”, or “HIGH”. High priority tasks are never dropped, so this level is reserved for only the most critical files. Medium and low priority tasks are dropped when the task buffer fills <em>and</em> the interprocess queue has reached a threshold percentage of capacity. These thresholds are set in the uploader’s configuration settings.</p>

<p>As an example, assume the threshold for dropping low priority tasks is set to 70%. If, during step two of a cycle, the task buffer is full, and the queue is at, say, 75% of capacity, the service will discard all low priority tasks in the buffer.</p>

<h4 id="submit-tasks-to-the-worker-pool">Submit tasks to the worker pool</h4>

<p>In step three of the loop, the uploader pulls a task off the task buffer (again in FIFO order) and attempts to submit it to the <strong>worker pool</strong>. This component is responsible for executing file uploads concurrently (rather than one by one). Each worker in the pool has a very straightfoward job: read the file referenced by the task from the local device, and use the AWS Python SDK <code class="language-plaintext highlighter-rouge">boto3</code> to upload the file to S3.</p>

<p>If there is space in the pool for the task, the submission succeeds, otherwise if fails. Normally, task submission is non-blocking, so if the submission fails the uploader immediately proceeds to step one of the next loop cycle. However, if the task buffer is full, but the queue has not yet reached a threshold for the buffer to start dropping tasks, the loop will pause for one second to see if space in the pool frees up. If not, it will release and start the next cycle and potential discard tasks before retrying submission.</p>

<p>The worker pool leverages Python’s <code class="language-plaintext highlighter-rouge">ThreadPoolExecutor</code> from the <code class="language-plaintext highlighter-rouge">concurrent.futures</code> library. By default, a Python thread pool just accepts every task sent its way, adding it to an internal buffer whose memory footprint grows if tasks are added faster than they are removed. Since we want to keep this footprint small, the worker pool implements a bounded semaphore. A semaphore is essentially a “thread-safe” counter. We increment the counter by 1 when a task is accepted by the worker pool. Then, each time a worker thread completes a task, it decrements the counter by 1. The thread-safe property is important; without it, two workers might try to decrement the counter simultaneously, leading to undefined behavior.</p>

<p>Along with the task itself, the uploader attached a post-success handler to each submission. When the worker reports a successful upload, the handler then deletes the file from the local device.</p>

<h3 id="optimizing-memory-footprint">Optimizing memory footprint</h3>

<p>I’m pretty familiar with the kinds of performance metrics used to evaluate a web-based application. A data pipeline was a different story. The big challenge here was ensuring the uploader didn’t demand too much memory from the local device; otherwise, the performance of the main application would degrade.</p>

<p>The uploader allocates memory in three main places:</p>

<ul>
  <li>The inter-process queue</li>
  <li>The task buffer</li>
  <li>The worker pool (including both the processes and its internal buffer)</li>
</ul>

<p>We can constraint the maximum amount of memory allocated to these components by adjusting a few variables: the capacity of the queue, the capacity of the task buffer, the number of workers in the pool, and the worker pool’s internal buffer.</p>

<p>While I won’t share exact numbers here, I can summarize my approach.</p>

<ol>
  <li>First, I estimated the average size, in bytes, of a single task held in memory. Keep in mind that a task moving through the uploader only needs to hold the full path to a file, not the file’s contents. So, each task in memory is likely only a few tens of bytes.</li>
  <li>Next, I assumed that the memory footprint of the worker threads would be approximately equal to one task, since the code to execute a worker was fairly small. That meant I could focus primarily on the queue and buffer.</li>
  <li>Through some experimental trial and error, I landed on an appropriate size for the task buffer large enough to preclude frequent discarding of tasks.</li>
  <li>All the remaining memory alloted to the uploader could be assigned to the queue.</li>
  <li>The worker pool’s internal buffer was set to some small multiple of the number of workers, such that each worker would have a few tasks waiting for it when it finished one, but a negligible memory footprint.</li>
</ol>

<h3 id="securing-and-provisioning-infrastructure">Securing and provisioning infrastructure</h3>

<p>I’ve been talking a lot about the client side of the data pipeline, but what about the back-end? AWS S3 handles accepting the upload and storing it, but there’s still the problem of access control. Since these devices are fully automated, it would be impracticale for developers to constantly remote connect to each one and re-enter a username and password just to retrieve new credentials when the previous ones expired. Plus, these devices are out in the world with customers who can physically access them. As always, proper security is essential.</p>

<p>To avoid potential breaches or exploitations, I followed the principle of least privilege, which demands that any authorized agent be granted the absolute bare minimum access needed to do the job properly. For the uploader service, this involved short-lived credentials to a write-only access point. Here’s the full breakdown. It may be difficult to follow if you’re not familiar with AWS permissions, but I’ll do my best to keep things simple.</p>

<ul>
  <li>Each device receives a set of long-term AWS credentials (access key + secret key) loaded into a file on the device. These credentials are associated with an AWS user.</li>
  <li>The AWS user is granted just one permanent permission: the ability to “assume” a role named “Uploader”. When a user assumes a role, they are granted all the permissions of that role for a short period of time (typically one hour). The “Uploader” role’s policy requires the device to provide a customer id, which must match the customer id assigned to AWS user whose credentials are being used. This ensures that the device cannot “spoof” another customer.</li>
  <li>The target for file uploads is an S3 bucket. This bucket cannot be accessed directly; instead, an “access point” is created that allows for file writing, but not reading. This provides a layer of protection for the bucket, as devices do not need to store the buckets true name in the code or configuration. Malicious actors probing the access point will never be able to read anything from it.</li>
  <li>The “Uploader” role has permissions to write to the S3 bucket via the write-only access point. This permission is restricted by a policy that only allows files to be written if their label is prefixed with the customer id given when the user assumed the role. E.g. if the device assumed the “Uploader” role with customer id “7000”, it could write files to the bucket, but only if the files are prefixed with <code class="language-plaintext highlighter-rouge">7000/</code>. This ensures the device respects the multi-tenant nature of the bucket and does not corrupt files for other clients.</li>
</ul>

<h2 id="area-of-improvement-keeping-project-scope-small">Area of improvement: Keeping project scope small</h2>

<p>My original proposal to this client was a massive technical design document. Then, when we pivoted to incremental development, I scoped out not just the uploader service but an entire data lake and warehouse as well. In hindsight, that was way too much in a short span of a few months. Fortunately, this client saw the value of the work that I was able to accomplish and embraced my Fractional Plan instead. I am now working with them part-time on whatever they need, when they need it.</p>

<p>In future engagements, I’m going to be more intentional about keeping project proposals small, breaking them into value-adding milestones as needed.</p>

<h2 id="final-takeaway">Final takeaway</h2>

<p>I learned an immeasurable amount while working on the uploader. Most importantly, the solution I implemented is still in use, uploading gigabytes of data every day as of this writing. I’m eager to find more opportunities to delve into the data engineering space. If you’re searching for a versatile developer to help your team accelerate their delivery, please reach out!</p>]]></content><author><name>Matthew Cardarelli</name></author><category term="blog" /><category term="client-stories" /><summary type="html"><![CDATA[In this client story, I help a tech startup efficiently upload large volumes of small files from their IoT devices to an AWS S3 bucket. It’s been several months since I completed this project, so my memory may be a bit fuzzy on details. This client has requested anonymity, so I’ll be speaking in very general terms about the business objectives.]]></summary></entry><entry><title type="html">One year of freelance software development: a retrospective</title><link href="https://matthewcardarelli.com/blog/my-freelancing-journey/2024/09/16/one-year-retrospective.html" rel="alternate" type="text/html" title="One year of freelance software development: a retrospective" /><published>2024-09-16T00:00:00-04:00</published><updated>2024-09-16T00:00:00-04:00</updated><id>https://matthewcardarelli.com/blog/my-freelancing-journey/2024/09/16/one-year-retrospective</id><content type="html" xml:base="https://matthewcardarelli.com/blog/my-freelancing-journey/2024/09/16/one-year-retrospective.html"><![CDATA[<p>This past Saturday, Matthew Cardarelli Solutions officially turned one year old! Time has flown since I started my self-employed developer journey. When I began last year <a href="/blog/my-freelancing-journey/2023/09/07/why-freelancing.html">I wrote a blog post</a> explaining the reasons I chose this path and what I hoped to gain from it. With a year under my belt, it’s as good a time as ever to review what I wrote and reflect on the past, present and future of my budding business endeavor.</p>

<h2 id="goal-no-1-understand-the-system">Goal No. 1: Understand the system</h2>

<p>Last year I wrote this about my first goal:</p>

<blockquote>
  <p>If I want to find out whether a better way to do business exists, I need to dive deeper into the system and understand how it really works. Win or lose, I’ll come out the other side better educated.</p>
</blockquote>

<p>I still feel like I’m at the tip of the iceberg here, but goal number 1 is definitely well underway! I have certainly learned a lot about the inner working of the software industry. Some of that education has come from observing the tumultuous upheaval of the U.S. tech industry. Beyond that, being self-employed has more or less forced me to approach my career and the industry with a degree of detachment and nuance that I previously lacked.</p>

<p>As an individual contributor, my goals were to earn a steady paycheck, feel like I was having a positive impact on the world, and improve my technical skills by working on interesting problems. I never concerned myself with the business side of software. In fact, I must confess that my eyes would typically glaze over any time an all-hands meeting reached the “sales and finance” segment. Now, as a contractor working directly with startups and businesses, the need for my clients to experience a return on their investment takes center stage.</p>

<p>Very quickly, I realized that my ability to find and retain clients hinged on understanding their goals, and the problems they were trying to solve with software. To acquire that knowledge, I started networking with start-up founders, CTOs, venture capital investors, small-business owners, and fellow freelancer and tech workers. Some of our discussions are highly technical, but we also branch off into economics, politics, and any other field you can imagine. Apparently, the world of business functions like a massive machine composed of heavily interdependent parts.</p>

<p>To my surprise, this emphasis on the business side of software has not sucked the joy from my day-to-day job as a developer. On the contrary, my insistence on placing client value front and center creates new and interesting constraints and challenges for me to solve. It also, I believe, has made me a better developer. My early-career tendencies toward over-analysis and perfectionism would never be sustainable as an independent contractor. By prioritizing only the features and decisions that really matter, I am better positioned to deliver real results.</p>

<p>The whole experience over the last year has also filled me with some very strong opinions about where the software industry needs improvement, particularly in terms of hiring, training, and career development. That topic is worth an entire post in and of itself, so I’ll hold my tongue for now!</p>

<h2 id="goal-no-2-a-seat-at-the-table">Goal No. 2: A seat at the table</h2>

<p>I summarized my second goal as follows:</p>

<blockquote>
  <p>…am I excited to comb through lengthy contracts, pay for my own health insurance, and manage my own taxes? Not entirely, though I admit I’m morbidly curious. Nevertheless, I am excited to find myself with a seat at the table, negotiating as an equal with some degree of real influence.</p>
</blockquote>

<p>The first part of my quote was definitely accurate. I am not enjoying paying for my own health insurance. I also had some pretty sub-par experiences with lawyers while drafting my contract templates. Figuring out my taxes would have been a total pain too, if not for my awesome accountant (shoutout to Al Lanzillotti!).</p>

<p>Fortunately, I also feel like I’ve already achieved everything I’d hoped for with regards to this goal! In just one year, I’ve:</p>

<ul>
  <li>Put together my own Master Service Agreement and Statement of Work templates, which clearly define the terms of service between myself and my clients.</li>
  <li>Built my own pricing algorithm, which I have used for every quote I’ve offered.</li>
  <li>Set up my own general business hours and out of office policy.</li>
  <li>Launched my company website and blog.</li>
  <li>Established my own prospect and new client workflows, including consultations, proposal documents, and contract negotiations.</li>
  <li>Conceived, designed, and launched my Fractional Developer Plan offering as a hybrid of the retainer and fee-for-value pricing models.</li>
</ul>

<p>I attribute at least some of this success to my amazing professional network. 100% of my business so far has been through referrals, and since I intentionally curate my network with mature and reasonable people, all of the clients I’ve worked with so far have been equally reasonable and pleasant to work with. This, as I understand, is <em>not</em> a universal experience in the world of freelancing. I am very grateful to everyone who’s sent a lead my way!</p>

<h2 id="goal-no-3-more-baskets-for-my-eggs">Goal No. 3: More baskets for my eggs</h2>

<p>Finally, I wrote this about my third goal:</p>

<blockquote>
  <p>From what I’ve heard, freelancing is really tough when you’re starting out. You’re constantly struggling to find new leads, win contracts, and build a portfolio that inspires trust. However, the cash flow of a successful freelancer is better hedged than a full-time employee’s. With multiple regular or recurring clients, you can rest a little easier knowing that even if one contract terminates, you still have the others. Plus, freelance contracts are more explicit about early termination, which can give you crucial buffer time and money to find more work.</p>
</blockquote>

<p>Of my three goals, this one is probably the slowest to progress. I was right to assume that it would take quite a while before payouts from my business could sustain my personal expenses. There were months this year where my revenue was precisely $0. But today, as I enter quarter four, I have two clients on my Fractional plan, and I’m starting to get at least one new lead per month. Better yet, I’ve grown my network locally in San Diego and virtually through digital communities, such that I’m pretty confident that I will be able to find some sort of work to do if and when my current contracts end.</p>

<p>I think one caveat would be that last line in my quote. My limited experience thus far has shown that most clients would prefer to avoid binding long-term contracts without a flexible termination clause. Perhaps that will change as I gain more experience, or if I pursue clients in new sectors.</p>

<h2 id="goals-for-2025-and-beyond">Goals for 2025 and beyond</h2>

<p>What am I looking to accomplish over the next twelve months? It’s pretty simple:</p>

<ul>
  <li>Reach true financial sustainability, a.k.a. pay myself enough from my business to cover rent and expenses without dipping into savings.</li>
  <li>Gather feedback from my current clients to identify areas of improvement.</li>
  <li>Continue to grow my professional network.</li>
</ul>

<p>Looking farther into the future, I want to take some of the hypotheses I’ve been developing about how to improve the software industry and put them to practice. Some ideas bouncing around my head include launching some sort of contract-to-hire service, taking on an apprentice, or launching a financially sustainable open-source SaaS application. I’ll also be closely following the evolution of AI so that I do not fall behind the tech landscape of the future.</p>

<p>Of course, even the best plans are destined to evolve drastically over time. I certainly can’t predict the future, but for now, I’m excited to keep this train chugging!</p>]]></content><author><name>Matthew Cardarelli</name></author><category term="blog" /><category term="my-freelancing-journey" /><summary type="html"><![CDATA[This past Saturday, Matthew Cardarelli Solutions officially turned one year old! Time has flown since I started my self-employed developer journey. When I began last year I wrote a blog post explaining the reasons I chose this path and what I hoped to gain from it. With a year under my belt, it’s as good a time as ever to review what I wrote and reflect on the past, present and future of my budding business endeavor.]]></summary></entry><entry><title type="html">Dev tricks: Animating a reordered list in React</title><link href="https://matthewcardarelli.com/blog/dev-tricks/2024/08/07/react-animated-list.html" rel="alternate" type="text/html" title="Dev tricks: Animating a reordered list in React" /><published>2024-08-07T00:00:00-04:00</published><updated>2024-08-07T00:00:00-04:00</updated><id>https://matthewcardarelli.com/blog/dev-tricks/2024/08/07/react-animated-list</id><content type="html" xml:base="https://matthewcardarelli.com/blog/dev-tricks/2024/08/07/react-animated-list.html"><![CDATA[<p>CSS animation is not an area I’ve invested a lot of time into learning. Most of the work I’ve done building user interfaces has involved densely populated administrative views where function dominates over form. So, I was excited to encounter a valid use case for implementing a custom CSS transition within a client project. Once I had it working, I wanted to document my discovery and share my solution in case others face a similar problem in the future.</p>

<h2 id="the-problem">The problem</h2>

<p>One of the pages in my client’s web app displays a list of items fetched from a server API. Some of the operations users can perform on this page cause the items to change their order. This was quite simple to implement in React: submit an API request to perform the server-side update, refetch the new data, and render the newly ordered items. No sweat.</p>

<p>The feedback I received was that the change in the order of items happened so fast, that it would be difficult for users to even see what had happened. Could I find a way to smoothly move the items from their old positions to their new ones? This, of course, was more challenging than it may seem. React prefers to handle all rendering and document object manipulation itself. I was going to need to use some sort of escape hatch to manually move the elements off of their natural positions on the page.</p>

<h2 id="researching-my-options">Researching my options</h2>

<p>When I’m solving a web development problem, I always ask three questions in this order:</p>

<ol>
  <li>How can I make the most of native web APIs (HTML, CSS, and the DOM)?</li>
  <li>How can I make the most of the third-party libraries I’m already using?</li>
  <li>How can I limit the quantity (and ensure the quality) of any new third-party libraries I need to use?</li>
</ol>

<p>For this solution, I assumed someone had already solved this problem in a nice, tidy way. To my surprise, my search turned up far fewer results than I had hoped. Thankfully, a couple of capable developers had documented their own solutions:</p>

<ul>
  <li>
    <!-- prettier-ignore-start -->
    <p><a href="https://medium.com/developers-writing/animating-the-unanimatable-1346a5aab3cd" target="_blank&quot;, rel=&quot;noopener noreferer">Animating the Unanimatable. | Joshua Comeau | Medium.com</a><!-- prettier-ignore-end --></p>
  </li>
  <li>
    <!-- prettier-ignore-start -->
    <p><a href="https://itnext.io/animating-list-reordering-with-react-hooks-aca5e7eeafba" target="_blank&quot;, rel=&quot;noopener noreferer">Animating list reordering with React Hooks | Tara Ojo | ITNEXT.io</a><!-- prettier-ignore-end --></p>
  </li>
</ul>

<p>These two blog posts were immensely helpful in teaching me about some essential browser behaviors and React utilities that would allow me to implement my own solution without importing any extra libraries.</p>

<h2 id="the-solution">The solution</h2>

<p>I’ve published my solution in a repository on my personal Gitea instance, which you are welcome to <!-- prettier-ignore-start --><a href="https://scm.matthewcardarelli.com/mcsolutions/demo-react-animated-list" target="_blank&quot;, rel=&quot;noopener noreferer">view or download</a><!-- prettier-ignore-end -->
. While I’ve published under an MIT license, I’d highly recommend NOT copy-pasting the solution into your own app. Better to read it, understand it, and then implement your own solution that will best meet your own needs.</p>

<p>Since everyone loves a good demo, I’ve also wrapped my solution in a little interactive web component that you can play with below!</p>

<react-animated-list-demo></react-animated-list-demo>

<h2 id="how-it-works">How it works</h2>

<p>This solution depends on a few key technologies and APIs:</p>

<ul>
  <li>The CSS spec gives us <!-- prettier-ignore-start --><a href="https://developer.mozilla.org/en-US/docs/Web/CSS/top" target="_blank&quot;, rel=&quot;noopener noreferer">top</a><!-- prettier-ignore-end -->
 to offset an element’s vertical position, and <!-- prettier-ignore-start --><a href="https://developer.mozilla.org/en-US/docs/Web/CSS/transition" target="_blank&quot;, rel=&quot;noopener noreferer">transition</a><!-- prettier-ignore-end -->
 to smooth out changes to CSS properties.</li>
  <li>The DOM APIs include <!-- prettier-ignore-start --><a href="https://developer.mozilla.org/en-US/docs/Web/API/Element/getBoundingClientRect" target="_blank&quot;, rel=&quot;noopener noreferer">getBoundingRect</a><!-- prettier-ignore-end -->
 to get the current screen position of an element, and <!-- prettier-ignore-start --><a href="https://developer.mozilla.org/en-US/docs/Web/API/Window/requestAnimationFrame" target="_blank&quot;, rel=&quot;noopener noreferer">requestAnimationFrame</a><!-- prettier-ignore-end -->
 to run code after the next screen paint completes.</li>
  <li>React’s <!-- prettier-ignore-start --><a href="https://react.dev/reference/react/useRef" target="_blank&quot;, rel=&quot;noopener noreferer">useRef</a><!-- prettier-ignore-end -->
 lets us manipulate DOM nodes directly, and <!-- prettier-ignore-start --><a href="https://react.dev/reference/react/useLayoutEffect" target="_blank&quot;, rel=&quot;noopener noreferer">useLayoutEffect</a><!-- prettier-ignore-end -->
 lets us hook into React post-render but prior to painting the screen.</li>
</ul>

<p>Let’s break down the solution in detail now.</p>

<h3 id="getting-dom-elements-from-react">Getting DOM elements from React</h3>

<p>We leverage <code class="language-plaintext highlighter-rouge">useRef()</code> to create a reference that will contain a mapping of element keys to element references. The keys we choose should be the same keys that we pass to the <code class="language-plaintext highlighter-rouge">key</code> render prop of each item in the list. This way, we can continue to reference the same React elements across re-renders.</p>

<!-- prettier-ignore-start -->

<figure class="highlight"><pre><code class="language-tsx" data-lang="tsx"><span class="kr">interface</span> <span class="nx">ListItemRefsById</span> <span class="p">{</span>
  <span class="p">[</span><span class="nx">id</span><span class="p">:</span> <span class="kr">string</span><span class="p">]:</span> <span class="nx">HTMLLIElement</span> <span class="o">|</span> <span class="kc">undefined</span><span class="p">;</span>
<span class="p">}</span>

<span class="k">export</span> <span class="kd">function</span> <span class="nf">myComponent</span><span class="p">()</span> <span class="p">{</span>
  <span class="kd">const</span> <span class="nx">itemRefs</span> <span class="o">=</span> <span class="nx">useRef</span><span class="o">&lt;</span><span class="nx">ListItemRefsById</span><span class="o">&gt;</span><span class="p">({});</span>

  <span class="c1">// rendering the list</span>
  <span class="k">return </span><span class="p">(&lt;</span><span class="nt">ol</span><span class="p">&gt;</span>
    <span class="si">{</span><span class="nx">items</span><span class="p">.</span><span class="nf">map</span><span class="p">((</span><span class="nx">item</span><span class="p">)</span> <span class="o">=&gt;</span> <span class="p">(</span>
      <span class="p">&lt;</span><span class="nt">li</span>
        <span class="na">key</span><span class="p">=</span><span class="si">{</span><span class="nx">item</span><span class="si">}</span>
        <span class="na">ref</span><span class="p">=</span><span class="si">{</span><span class="p">(</span><span class="nx">li</span><span class="p">)</span> <span class="o">=&gt;</span> <span class="nx">li</span> <span class="o">===</span> <span class="kc">null</span> <span class="p">?</span> <span class="k">delete</span> <span class="nx">itemRefs</span><span class="p">.</span><span class="nx">current</span><span class="p">[</span><span class="nx">item</span><span class="p">]</span> <span class="p">:</span> <span class="p">(</span><span class="nx">itemRefs</span><span class="p">.</span><span class="nx">current</span><span class="p">[</span><span class="nx">item</span><span class="p">]</span> <span class="o">=</span> <span class="nx">li</span><span class="p">)</span><span class="si">}</span>
      <span class="p">&gt;</span>
        <span class="si">{</span><span class="nx">item</span><span class="si">}</span>
      <span class="p">&lt;/</span><span class="nt">li</span><span class="p">&gt;</span>
    <span class="p">))</span><span class="si">}</span>
  <span class="p">&lt;/</span><span class="nt">ol</span><span class="p">&gt;);</span>
<span class="p">}</span></code></pre></figure>

<!-- prettier-ignore-end -->

<h3 id="tracking-element-positions">Tracking element positions</h3>

<p>We call <code class="language-plaintext highlighter-rouge">getBoundingRect</code> on each element reference two times for each re-ordering event. The first call occurs in the callback that causes the change in ordering. We save positions in a separate ref map as the initial positions of each element, prior to reordering. Our second call is inside our <code class="language-plaintext highlighter-rouge">useLayoutEffect</code> hook, to get the elements’ new positions after the reordering.</p>

<!-- prettier-ignore-start -->

<figure class="highlight"><pre><code class="language-tsx" data-lang="tsx"><span class="kr">interface</span> <span class="nx">ItemTops</span> <span class="p">{</span>
  <span class="p">[</span><span class="nx">id</span><span class="p">:</span> <span class="kr">string</span><span class="p">]:</span> <span class="kr">number</span> <span class="o">|</span> <span class="kc">undefined</span><span class="p">;</span>
<span class="p">}</span>

<span class="k">export</span> <span class="kd">function</span> <span class="nf">myComponent</span><span class="p">()</span> <span class="p">{</span>
  <span class="cm">/* previous code */</span>
  <span class="kd">const</span> <span class="nx">itemTops</span> <span class="o">=</span> <span class="nx">useRef</span><span class="o">&lt;</span><span class="nx">ItemTops</span><span class="o">&gt;</span><span class="p">({});</span>

  <span class="nf">useLayoutEffect</span><span class="p">(()</span> <span class="o">=&gt;</span> <span class="p">{</span>
    <span class="k">if </span><span class="p">(</span><span class="o">!</span><span class="nx">keys</span><span class="p">)</span> <span class="k">return</span><span class="p">;</span>
    <span class="nx">keys</span><span class="p">.</span><span class="nf">forEach</span><span class="p">((</span><span class="nx">key</span><span class="p">)</span> <span class="o">=&gt;</span> <span class="p">{</span>
      <span class="kd">const</span> <span class="nx">itemRef</span> <span class="o">=</span> <span class="nx">itemRefs</span><span class="p">.</span><span class="nx">current</span><span class="p">[</span><span class="nx">key</span><span class="p">];</span>
      <span class="k">if </span><span class="p">(</span><span class="nx">itemRef</span><span class="p">)</span> <span class="p">{</span>
        <span class="kd">const</span> <span class="nx">currentTop</span> <span class="o">=</span> <span class="nx">itemRef</span><span class="p">.</span><span class="nf">getBoundingClientRect</span><span class="p">().</span><span class="nx">top</span><span class="p">;</span>
        <span class="cm">/* Need to implement the rest of this still... */</span>
      <span class="p">}</span>
    <span class="p">});</span>
  <span class="p">},</span> <span class="p">[</span><span class="nx">items</span><span class="p">]);</span>

  <span class="k">return </span><span class="p">(</span>
    <span class="p">{</span><span class="cm">/* code for rendering the list */</span><span class="p">}</span>
    <span class="p">&lt;</span><span class="nt">button</span>
      <span class="na">type</span><span class="p">=</span><span class="s">"button"</span>
      <span class="na">onClick</span><span class="p">=</span><span class="si">{</span><span class="p">()</span> <span class="o">=&gt;</span> <span class="p">{</span>
        <span class="nf">updateItemPositions</span><span class="p">();</span>
        <span class="nf">mutateItems</span><span class="p">(</span><span class="dl">'</span><span class="s1">reverse</span><span class="dl">'</span><span class="p">);</span>
      <span class="p">}</span><span class="si">}</span>
    <span class="p">&gt;</span>
      Remove
    <span class="p">&lt;/</span><span class="nt">button</span><span class="p">&gt;</span>
  <span class="p">)</span>
<span class="p">}</span></code></pre></figure>

<!-- prettier-ignore-end -->

<h3 id="rewinding-element-positions-temporarily">“Rewinding” element positions (temporarily)</h3>

<p>Let’s recap our flow so far:</p>

<ol>
  <li>Initial render and paint. We get references to each item’s element.</li>
  <li>Some event triggers a reordering. We save the elements initial positions before the next render.</li>
  <li>The new list of items is rendered. Before the screen paints, our <code class="language-plaintext highlighter-rouge">useLayoutEffect()</code> hook is called, and we get the element’s new positions.</li>
</ol>

<p>From here, we’re still inside our layout hook. For each element, we compute the difference between its initial position and the new position that React is about to (but has not yet) paint the element to the screen. We save these computations into yet another key-element mapping, but this time we are using plain old <code class="language-plaintext highlighter-rouge">useState</code> rather than <code class="language-plaintext highlighter-rouge">useRef</code>. And guess what? Because we modified our component state, React will re-render the component <em>before</em> it paints to the screen! During this new re-render, we will pass <code class="language-plaintext highlighter-rouge">top: -difference</code> into the inline styles for each item. If we have set the items’ <code class="language-plaintext highlighter-rouge">position</code> to <code class="language-plaintext highlighter-rouge">relative</code>, they will appear in the exact same place they were before! We will also pass <code class="language-plaintext highlighter-rouge">transition: top 0s</code> to tell the browser to apply the new <code class="language-plaintext highlighter-rouge">top</code> value immediately.</p>

<!-- prettier-ignore-start -->

<figure class="highlight"><pre><code class="language-tsx" data-lang="tsx"><span class="kr">interface</span> <span class="nx">ItemOffsets</span> <span class="p">{</span>
  <span class="p">[</span><span class="nx">id</span><span class="p">:</span> <span class="kr">string</span><span class="p">]:</span> <span class="kr">number</span> <span class="o">|</span> <span class="kc">undefined</span><span class="p">;</span>
<span class="p">}</span>

<span class="k">export</span> <span class="kd">function</span> <span class="nf">myComponent</span><span class="p">()</span> <span class="p">{</span>
  <span class="cm">/* useRef and useState declarations */</span>

  <span class="cm">/*
   * If we used useState it would be too late. The elements would "flash" on the screen in their new
   * positions before the offset was applied.
   */</span>

  <span class="nf">useLayoutEffect</span><span class="p">(()</span> <span class="o">=&gt;</span> <span class="p">{</span>
    <span class="k">if </span><span class="p">(</span><span class="o">!</span><span class="nx">keys</span><span class="p">)</span> <span class="k">return</span><span class="p">;</span>
    <span class="kd">const</span> <span class="na">newItemOffsets</span><span class="p">:</span> <span class="nx">ItemOffsets</span> <span class="o">=</span> <span class="p">{};</span>
    <span class="nx">keys</span><span class="p">.</span><span class="nf">forEach</span><span class="p">((</span><span class="nx">key</span><span class="p">)</span> <span class="o">=&gt;</span> <span class="p">{</span>
      <span class="kd">const</span> <span class="nx">itemRef</span> <span class="o">=</span> <span class="nx">itemRefs</span><span class="p">.</span><span class="nx">current</span><span class="p">[</span><span class="nx">key</span><span class="p">];</span>
      <span class="k">if </span><span class="p">(</span><span class="nx">itemRef</span><span class="p">)</span> <span class="p">{</span>
        <span class="kd">const</span> <span class="nx">currentTop</span> <span class="o">=</span> <span class="nx">itemRef</span><span class="p">.</span><span class="nf">getBoundingClientRect</span><span class="p">().</span><span class="nx">top</span><span class="p">;</span>
        <span class="kd">const</span> <span class="nx">prevTop</span> <span class="o">=</span> <span class="nx">itemTops</span><span class="p">.</span><span class="nx">current</span><span class="p">[</span><span class="nx">key</span><span class="p">]</span> <span class="o">||</span> <span class="mi">0</span><span class="p">;</span>
        <span class="kd">const</span> <span class="nx">offset</span> <span class="o">=</span> <span class="o">-</span><span class="p">(</span><span class="nx">currentTop</span> <span class="o">-</span> <span class="nx">prevTop</span><span class="p">);</span>
        <span class="nx">newItemOffsets</span><span class="p">[</span><span class="nx">key</span><span class="p">]</span> <span class="o">=</span> <span class="nx">offset</span><span class="p">;</span>
      <span class="p">}</span>
    <span class="p">});</span>
    <span class="nf">setItemOffsets</span><span class="p">(</span><span class="nx">newItemOffsets</span><span class="p">);</span>
  <span class="p">},</span> <span class="p">[</span><span class="nx">keys</span><span class="p">]);</span>

  <span class="k">return </span><span class="p">(</span>
    <span class="p">&lt;</span><span class="nt">ol</span><span class="p">&gt;</span>
      <span class="si">{</span><span class="nx">items</span><span class="p">.</span><span class="nf">map</span><span class="p">((</span><span class="nx">item</span><span class="p">)</span> <span class="o">=&gt;</span> <span class="p">(</span>
        <span class="p">&lt;</span><span class="nt">li</span>
          <span class="na">key</span><span class="p">=</span><span class="si">{</span><span class="nx">item</span><span class="si">}</span>
          <span class="na">ref</span><span class="p">=</span><span class="si">{</span><span class="p">(</span><span class="nx">li</span><span class="p">)</span> <span class="o">=&gt;</span> <span class="nx">li</span> <span class="o">===</span> <span class="kc">null</span> <span class="p">?</span> <span class="k">delete</span> <span class="nx">itemRefs</span><span class="p">.</span><span class="nx">current</span><span class="p">[</span><span class="nx">item</span><span class="p">]</span> <span class="p">:</span> <span class="p">(</span><span class="nx">itemRefs</span><span class="p">.</span><span class="nx">current</span><span class="p">[</span><span class="nx">item</span><span class="p">]</span> <span class="o">=</span> <span class="nx">li</span><span class="p">)</span><span class="si">}</span>
          <span class="na">style</span><span class="p">=</span><span class="si">{</span><span class="p">{</span>
            <span class="na">position</span><span class="p">:</span> <span class="dl">'</span><span class="s1">relative</span><span class="dl">'</span><span class="p">,</span>
            <span class="na">top</span><span class="p">:</span> <span class="nx">itemOffsets</span><span class="p">[</span><span class="nx">key</span><span class="p">]</span> <span class="o">||</span> <span class="mi">0</span><span class="p">,</span>
            <span class="na">transition</span><span class="p">:</span> <span class="dl">'</span><span class="s1">top 0s</span><span class="dl">'</span><span class="p">,</span>
          <span class="p">}</span><span class="si">}</span>
        <span class="p">&gt;</span>
          <span class="si">{</span><span class="nx">item</span><span class="si">}</span>
        <span class="p">&lt;/</span><span class="nt">li</span><span class="p">&gt;</span>
      <span class="p">))</span><span class="si">}</span>
    <span class="p">&lt;/</span><span class="nt">ol</span><span class="p">&gt;</span>
    <span class="p">&lt;</span><span class="nt">button</span>
      <span class="na">type</span><span class="p">=</span><span class="s">"button"</span>
      <span class="na">onClick</span><span class="p">=</span><span class="si">{</span><span class="p">()</span> <span class="o">=&gt;</span> <span class="p">{</span>
        <span class="nf">updateItemPositions</span><span class="p">();</span>
        <span class="nf">mutateItems</span><span class="p">(</span><span class="dl">'</span><span class="s1">reverse</span><span class="dl">'</span><span class="p">);</span>
      <span class="p">}</span><span class="si">}</span>
    <span class="p">&gt;</span>
      Remove
    <span class="p">&lt;/</span><span class="nt">button</span><span class="p">&gt;</span>
  <span class="p">)</span>
<span class="p">}</span></code></pre></figure>

<!-- prettier-ignore-end -->

<h3 id="forcing-the-transition">Forcing the transition</h3>

<p>I left out a small but important step in the last section. At the end of our <code class="language-plaintext highlighter-rouge">useLayoutHook()</code>, we make a call to <code class="language-plaintext highlighter-rouge">requestAnimationFrame()</code>. This lets us set up a callback function that runs <em>after</em> the next screen paint. All we need to do in this callback is clear the calculated differences from our component state. This will trigger another re-render. During this render, we will skip passing <code class="language-plaintext highlighter-rouge">top</code>, and instead pass <code class="language-plaintext highlighter-rouge">transition: top 2s</code>. Now, when the browser going to paint the screen, it will detect the change in the element positions, but it will also know that it should gradually move the element from its previous position to its new one.</p>

<!-- prettier-ignore-start -->

<figure class="highlight"><pre><code class="language-tsx" data-lang="tsx"><span class="k">export</span> <span class="kd">function</span> <span class="nf">myComponent</span><span class="p">()</span> <span class="p">{</span>
  <span class="cm">/* other code */</span>
  
  <span class="kd">const</span> <span class="p">[</span><span class="nx">itemOffsets</span><span class="p">,</span> <span class="nx">setItemOffsets</span><span class="p">]</span> <span class="o">=</span> <span class="nx">useState</span><span class="o">&lt;</span><span class="nx">ItemOffsets</span><span class="o">&gt;</span><span class="p">({});</span>

  <span class="nf">useLayoutEffect</span><span class="p">(()</span> <span class="o">=&gt;</span> <span class="p">{</span>
    <span class="k">if </span><span class="p">(</span><span class="o">!</span><span class="nx">keys</span><span class="p">)</span> <span class="k">return</span><span class="p">;</span>
    <span class="kd">const</span> <span class="na">newItemOffsets</span><span class="p">:</span> <span class="nx">ItemOffsets</span> <span class="o">=</span> <span class="p">{};</span>
    <span class="nx">keys</span><span class="p">.</span><span class="nf">forEach</span><span class="p">((</span><span class="nx">key</span><span class="p">)</span> <span class="o">=&gt;</span> <span class="p">{</span>
      <span class="kd">const</span> <span class="nx">itemRef</span> <span class="o">=</span> <span class="nx">itemRefs</span><span class="p">.</span><span class="nx">current</span><span class="p">[</span><span class="nx">key</span><span class="p">];</span>
      <span class="k">if </span><span class="p">(</span><span class="nx">itemRef</span><span class="p">)</span> <span class="p">{</span>
        <span class="kd">const</span> <span class="nx">currentTop</span> <span class="o">=</span> <span class="nx">itemRef</span><span class="p">.</span><span class="nf">getBoundingClientRect</span><span class="p">().</span><span class="nx">top</span><span class="p">;</span>
        <span class="kd">const</span> <span class="nx">prevTop</span> <span class="o">=</span> <span class="nx">itemTops</span><span class="p">.</span><span class="nx">current</span><span class="p">[</span><span class="nx">key</span><span class="p">]</span> <span class="o">||</span> <span class="mi">0</span><span class="p">;</span>
        <span class="kd">const</span> <span class="nx">offset</span> <span class="o">=</span> <span class="o">-</span><span class="p">(</span><span class="nx">currentTop</span> <span class="o">-</span> <span class="nx">prevTop</span><span class="p">);</span>
        <span class="nx">newItemOffsets</span><span class="p">[</span><span class="nx">key</span><span class="p">]</span> <span class="o">=</span> <span class="nx">offset</span><span class="p">;</span>
      <span class="p">}</span>
    <span class="p">});</span>
    <span class="nf">setItemOffsets</span><span class="p">(</span><span class="nx">newItemOffsets</span><span class="p">);</span>

    <span class="cm">/* clear our offsets after the next screen paint */</span>
    <span class="nf">requestAnimationFrame</span><span class="p">(()</span> <span class="o">=&gt;</span> <span class="p">{</span>
      <span class="nf">setItemOffsets</span><span class="p">({});</span>
    <span class="p">});</span>
  <span class="p">},</span> <span class="p">[</span><span class="nx">keys</span><span class="p">]);</span>

  <span class="k">return </span><span class="p">(</span>
    <span class="p">&lt;</span><span class="nt">ol</span><span class="p">&gt;</span>
      <span class="si">{</span><span class="nx">items</span><span class="p">.</span><span class="nf">map</span><span class="p">((</span><span class="nx">item</span><span class="p">)</span> <span class="o">=&gt;</span> <span class="p">(</span>
        <span class="p">&lt;</span><span class="nt">li</span>
          <span class="na">key</span><span class="p">=</span><span class="si">{</span><span class="nx">item</span><span class="si">}</span>
          <span class="na">ref</span><span class="p">=</span><span class="si">{</span><span class="p">(</span><span class="nx">li</span><span class="p">)</span> <span class="o">=&gt;</span> <span class="nx">li</span> <span class="o">===</span> <span class="kc">null</span> <span class="p">?</span> <span class="k">delete</span> <span class="nx">itemRefs</span><span class="p">.</span><span class="nx">current</span><span class="p">[</span><span class="nx">item</span><span class="p">]</span> <span class="p">:</span> <span class="p">(</span><span class="nx">itemRefs</span><span class="p">.</span><span class="nx">current</span><span class="p">[</span><span class="nx">item</span><span class="p">]</span> <span class="o">=</span> <span class="nx">li</span><span class="p">)</span><span class="si">}</span>
          <span class="na">style</span><span class="p">=</span><span class="si">{</span><span class="p">{</span>
            <span class="na">position</span><span class="p">:</span> <span class="dl">'</span><span class="s1">relative</span><span class="dl">'</span><span class="p">,</span>
            <span class="na">top</span><span class="p">:</span> <span class="nx">itemOffsets</span><span class="p">[</span><span class="nx">key</span><span class="p">]</span> <span class="o">||</span> <span class="mi">0</span><span class="p">,</span>
            <span class="c1">// during the same render where we remove the offset, we apply the transition property with a non-zero value.</span>
            <span class="na">transition</span><span class="p">:</span> <span class="o">!</span><span class="nx">itemTops</span><span class="p">.</span><span class="nx">current</span><span class="p">[</span><span class="nx">key</span><span class="p">]</span> <span class="o">||</span> <span class="nx">itemOffsets</span><span class="p">[</span><span class="nx">key</span><span class="p">]</span> <span class="p">?</span> <span class="dl">'</span><span class="s1">top 0s</span><span class="dl">'</span> <span class="p">:</span> <span class="dl">'</span><span class="s1">top 1s</span><span class="dl">'</span><span class="p">,</span>
          <span class="p">}</span><span class="si">}</span>
        <span class="p">&gt;</span>
          <span class="si">{</span><span class="nx">item</span><span class="si">}</span>
        <span class="p">&lt;/</span><span class="nt">li</span><span class="p">&gt;</span>
      <span class="p">))</span><span class="si">}</span>
    <span class="p">&lt;/</span><span class="nt">ol</span><span class="p">&gt;</span>
    <span class="p">&lt;</span><span class="nt">button</span>
      <span class="na">type</span><span class="p">=</span><span class="s">"button"</span>
      <span class="na">onClick</span><span class="p">=</span><span class="si">{</span><span class="p">()</span> <span class="o">=&gt;</span> <span class="p">{</span>
        <span class="nf">updateItemPositions</span><span class="p">();</span>
        <span class="nf">mutateItems</span><span class="p">(</span><span class="dl">'</span><span class="s1">reverse</span><span class="dl">'</span><span class="p">);</span>
      <span class="p">}</span><span class="si">}</span>
    <span class="p">&gt;</span>
      Remove
    <span class="p">&lt;/</span><span class="nt">button</span><span class="p">&gt;</span>
  <span class="p">)</span>
<span class="p">}</span></code></pre></figure>

<!-- prettier-ignore-end -->

<p>In case you lost track, here is what happened during our last three screen paints:</p>

<ol>
  <li>Prior to re-ordering (old positions, no offset)</li>
  <li>First frame after re-ordering (new positions, but offset to old positions using <code class="language-plaintext highlighter-rouge">top: -[DELTA]; transition: top 0s;</code>)</li>
  <li>Second frame after re-ordering (new positions, no offset, moved gradually from old positions using <code class="language-plaintext highlighter-rouge">transition: top 2s;</code>)</li>
</ol>

<p>The trickiest thing about this is distinguishing a React render, which determines how and where elements <em>should</em> be updated, and a browser paint, which actually updates the user’s window. There are two React renders between the first and second paint (thanks to our <code class="language-plaintext highlighter-rouge">useLayoutEffect()</code> hook setting some local state), then a single render between the second and third paint (because <code class="language-plaintext highlighter-rouge">items</code> doesn’t change, so <code class="language-plaintext highlighter-rouge">useLayoutEffect()</code> does not fire again).</p>

<h2 id="caveats-and-limitations">Caveats and limitations</h2>

<p>The source code I published was implemented to cover the minimal requirements necessary for my client’s project. So there are some major limitations:</p>

<ul>
  <li>I only implemented vertical animation. To include horizontal animations, just apply the same logic using the <code class="language-plaintext highlighter-rouge">left</code> position property as well.</li>
  <li>It does not work for transitions on initial render, only for changes that happen after the first render.</li>
  <li>It is not optimized for large lists. The blogs I linked discuss some ways to optimize by using CSS <code class="language-plaintext highlighter-rouge">transform</code>.</li>
  <li>The interface for the hook I created to encapsulate this logic requires a lot of manual rigging. I’m sure with more investment someone could make it more auto-magical.</li>
</ul>

<h2 id="animate-away">Animate away!</h2>

<p>I hope you’ve found this blog helpful and informative! Feel free to contact me if you have any feedback or comments.</p>

<script src="/assets/scripts/demo-react-animated-list.js"></script>

<link rel="stylesheet" href="/assets/css/pages/blog/react-animated-list.css" />]]></content><author><name>Matthew Cardarelli</name></author><category term="blog" /><category term="dev-tricks" /><summary type="html"><![CDATA[]]></summary></entry><entry><title type="html">Introducing the Fractional Developer Plan!</title><link href="https://matthewcardarelli.com/blog/news/2024/05/13/fractional-developer-plan-launch.html" rel="alternate" type="text/html" title="Introducing the Fractional Developer Plan!" /><published>2024-05-13T00:00:00-04:00</published><updated>2025-07-15T12:45:00-04:00</updated><id>https://matthewcardarelli.com/blog/news/2024/05/13/fractional-developer-plan-launch</id><content type="html" xml:base="https://matthewcardarelli.com/blog/news/2024/05/13/fractional-developer-plan-launch.html"><![CDATA[<div role="alert">
  <h2 class="statement"><img src="/assets/img/icon-alert.svg" />This blog post is out of date!</h2>
  <p class="major-content">Please visit the <a href="/pricing/fractional-plan.html">Fractional Plan Pricing</a> page for up-to-date information.</p>
</div>

<p>Thus far, Matthew Cardarelli Solutions has operated exclusively on a per-project freelance basis. This has been a great way for me to build client relationships by skillfully executing short-term projects with well-defined requirements.</p>

<p>In the meantime, I’ve been working behind the scenes to create an alternative better suited to clients with long-term needs and rapidly-changing requirements. Today, I’m officially launching a new offering I call the “Fractional Developer Plan.” Continue reading to learn how the Plan works and why I believe it’s an improvement over traditional developer pricing models. At the end, I’ve included an FAQ for prospective clients and anyone else curious to learn more.</p>

<h2 id="how-does-the-fractional-developer-plan-work">How does the Fractional Developer Plan work?</h2>

<p>At its core, the Fractional Developer Plan is a <strong>subscription-based</strong>, <strong>fee-for-value</strong> freelance contract that allows you to secure my services and availability on a recurring basis. It’s similar to a traditional retainer contract, with a few key differences.</p>

<p>Like a retainer, you pay a fixed monthly fee, but instead of paying for a specific number of hours, you pay for a number of “Developer Days.” A Developer Day is a business day where I provide at least six hours of services to you. This could be writing code, reviewing code, writing tests, investigating bugs, deploying infrastructure, discovering requirements, participating in design meetings, or anything else I do in service to your organization.</p>

<p>The other difference between this Plan and a traditional retainer is how I demonstrate accountablility. Rather than install an invasive time-tracking app, or meticulously manage an hourly timesheet, I keep a monthly journal. This journal tracks:</p>

<ul>
  <li>How your Developer Days are allocated toward your organization’s initiatives</li>
  <li>Each instance of service you receive</li>
</ul>

<p>At the end of each month you receive a report generated from the journal, which presents a clear picture of how I converted your Developer Days into value-adding services.</p>

<h2 id="an-illustrative-example">An illustrative example</h2>

<p>To better understand how this works, let’s walk through an example. Client Awesome expresses interest in a Fractional Development Plan. They own a consumer-facing web application that is crucial to their business, but does not require a full-time developer to maintain. We begin with a collaborative discover process, where I help them estimate how many Developer Days they will need each month. In this case, we determine that they will need at least five Developer Days’ worth of work performed each month. Client Awesome requests that, as part of that allotment, I attend their internal demo and presentation meetings every other Wednesday to provide feedback to their internal teams. We sign a contract in early May, with an effective date of June 1st.</p>

<p>On May 20th, I reach out to Client Awesome in order to sync up on their highest priorities for June. They have a list of small bug fixes they’d like done ASAP, and one Big New Feature they’re hoping to launch in the Fall. On June 1st, Client Awesome receives an invoice for the June monthly fee.</p>

<p>Here’s how the rest of June shakes out:</p>

<ul>
  <li>I spend <strong>2.5 Developer Days</strong> maintaining the web app, primarily by fixing bugs.</li>
  <li>I spend <strong>2 Developer Days</strong> working on the implementation of Big New Feature.</li>
  <li>I attend two demo presentations, each 1-hour long, to provide feedback. These add up to just over <strong>one-quarter of a Developer Day</strong>.</li>
  <li>On June 20th, I reach out to Client Awesome to align on priorities and requirements for July.</li>
  <li>Near the end of the month, an urgent bug is reported. At Client Awesome’s request, I spend <strong>one-half of a Dev Day</strong> to fix it. This effort brings me to <strong>5.25 Dev Days for June</strong>, just over the monthly quota.</li>
  <li>On July 1st, I send out the June work report and the July invoice. The invoice includes both July’s monthly fee and the June overtime charge for the extra quarter-day.</li>
</ul>

<p>I’ve created a <strong><a href="/assets/pdf/news_fractional-development-plan-launch_sample-report.pdf">sample work report</a></strong> and <strong><a href="/assets/pdf/news_fractional-development-plan-launch_sample-invoice.pdf">sample invoice</a></strong> to illustrate what Client Awesome would have received on July 1st. <strong>Please note that the prices shown on the invoice are completely fabricated and not a reflection of my actual pricing.</strong></p>

<h2 id="fractional-developer-plan-faqs">Fractional Developer Plan FAQs</h2>

<p>Click on a question below to view the answer.</p>

<details>
  <summary class="major-content">What inspired the Fractional Development Plan?
  </summary>

  <p class="content">
    A few different things led me to create this Plan. First of all, I've received inquiries from multiple clients and prospects about the possibility of contracting me on retainer, so I knew there was demand for something like this. Second, I've noticed a trend in online freelance and consulting circles where self-employed individuals, from associates all the way to the C-suite, are offering services on a "fractional" basis to organizations that may not be able to afford hiring someone with their skills full-time.
  </p>

  <p class="content">
    I'll readily admit that I am by no means the first or only person to have this idea. I'm jumping on the bandwagon because I genuinely believe this is a great way for me to offer long-term service contracts to both new and existing clients.
  </p>
</details>

<details>
  <summary class="major-content">Why does the Plan use Developer Days instead of hours?
  </summary>

  <p class="content">
    Most types of work performed by a software developer demand several hours of uninterrupted focus. Many developers, including myself, perform their work more efficiently if they can dedicate most, if not the entirety, of each day to a single goal or objective. Knowing this, booking and billing work by the hour seems counterproductive to both me and my clients.
  </p>

  <p class="content">
    I've chosen the "Developer Day" as my unit of fractional freelancing because it lets me divide my availability into units that maximize both the quantity and quality of service I can provide.
  </p>
</details>

<details>
  <summary class="major-content">Without precise time tracking, how do I know I'm getting what I paid for?
  </summary>

  <p class="content">
    The short answer is, <em>it doesn't matter</em>. Or rather, it shouldn't matter to you.
  </p>

  <p class="content">
    For results-based services such as software development, you should be looking for <em>proof-of-results</em> rather than <em>proof-of-effort</em>. That's why my work report allocates Developer Days directly to deliverables. To determine your return on investment, you only need to answer one question: <strong>for a given month, was the value of the services and deliverables I received greater than the monthly service fee?</strong> 
  </p>

  <p class="content">
    If the answer is yes, great! If the answer is no, you've identified an inefficiency or misalignment that we should work together to remedy.
  </p>
</details>

<details>
  <summary class="major-content">Why not offer an hourly retainer?
  </summary>

  <p class="content">
    The Fractional Developer Plan has two advantages over an hourly retainer:
  </p>

  <ol class="content">
    <li>It simplifies clients' cost-benefit analysis by emphasizing output and outcomes over time and effort.</li>
    <li>It minimizes my own administrative overhead so I can focus on exceptional service.</li>
  </ol>
</details>

<details>
  <summary class="major-content">Why not offer a pure fee-for-value plan?
  </summary>
  <p class="content">
    While it's true that software development is primarily an outcome-based service, I know that clients still value availability and presence. By reserving Developer Days in advance, I can ensure my availablity to you on a consistent basis each month. Additionally, I am better able to predict my workload and avoid taking on too many clients at once, resulting in higher-quality service to you.
  </p>

  <p class="content">
    If you have a well-defined scope of work already, and have a good idea of what that work is worth to you, you might be more interested in my fixed-cost Project pricing. You can learn more about that on my <a href="/pricing">Pricing page</a>.
  </p>
</details>

<details>
  <summary class="major-content">Can I pay at the end of the month, instead of the start?
  </summary>
  <p class="content">
    I am happy to accomodate your organization's payroll by shifting the invoice date to the last day of each month. Please note that the monthly service fee is always incurred at the start of the month, regardless of when you receive your invoice.
  </p>
</details>

<details>
  <summary class="major-content">How do you compute the monthly service fee?
  </summary>
  <p class="content">
    The monthly service fee calculation considers multiple factors, including but not limited to:
  </p>

  <ul>
    <li>The quantity of Developer Days purchased per month.</li>
    <li>Current market rates for full-time and freelancer developers with skillsets equivalent to mine.</li>
    <li>My relevant skills and expertise within your business and technology domains.</li>
  </ul>

  <p class="content">
    That third item is especially important. If your needs are highly aligned with my core skillset, you will pay a higher rate per Developer Day, and in return, you will get more value per Day. If your work requires me to upskill or learn new knowledge domains, your rate will be lower to account for my relatively lower efficiency.
  </p>
</details>

<details>
  <summary class="major-content">What if the work to be done doesn't fit nicely into full Developer Days?
  </summary>
  <p class="content">
    Developer Days need not align one-to-one with calendar days. My primary commitment to you is to allocate time to your requests equivalent to the number of Developer Days you booked. The best approach during a given month might involve splitting a Developer Day across several calendar days.
  </p>

  <p class="content">
    That said, if you expect to request many small jobs of less than a day's work, and the timing of those jobs is infrequent or unpredictable, the Fractional Developer Plan is probably not the right choice for you. My <a href="/pricing">Pricing page</a> has more information on the other options available.
  </p>
</details>

<details>
  <summary class="major-content">What if my needs change in the middle of a month?
  </summary>
  <p class="content">
    If your needs change, just let me know as soon as possible and I will pivot my focus. I rely on you to keep me up to date on the relative priority of your outstanding requests. In return, I keep you up-to-date throughout each month on my progress and any blockers that may risk delaying my work.
  </p>
</details>

<details>
  <summary class="major-content">What if I need <em>more</em> Developer Days in a given month?
  </summary>
  <p class="content">
    If you need additional Developer Days in a given month, you can always request them, and I'll do the best I can to accomodate. If I have the time available, you'll pay the same rate per extra Developer Day as you would have if you pre-paid for them. If I'm already booked, and you have an urgent need for additional work, I offer priority service for an additional fee.
  </p>

  <p class="content">
    You can request a permanent increase to your Plan's Developer Day allotment at any time.
  </p>
</details>

<details>
  <summary class="major-content">What if I need <em>fewer</em> Developer Days in a given month?
  </summary>
  <p class="content">
    Because I reserve Developer Days exclusively for you ahead of time, it's not possible to request a one-month discount on your Plan. For this reason, I recommend starting with the minimum number of Developer Days you can confidently utilize, and then increasing that number if you find yourself requesting extra Dev Days each month.
  </p>

  <p class="content">
    You can request a permanent decrease to your Plan's Developer Day allotment at any time.
  </p>
</details>

<details>
  <summary class="major-content">What is the typical term of a Fractional Developer Plan?
  </summary>
  <p class="content">
    Plan contracts are active for three to six months, with an option to renew if both of us agree to continue working together.
  </p>
</details>

<details>
  <summary class="major-content">What if I want to cancel my Plan?
  </summary>
  <p class="content">
    You may terminate your Plan at any time. 30 days' notice is required. You will owe the fee for the month in which you cancel, if you haven't paid it already.
  </p>
</details>

<h2 id="the-future-is-fractional">The future is fractional!</h2>

<p>Stop paying hourly for development services! With my Fractional Developer Plan, you pay for output, not hours, while gaining access to the full depth and breadth of my skills and industry experience.</p>

<p><strong>Ready to augment your R&amp;D capabilities with a Fractional Developer Plan? <a href="/contact.html">Contact me</a> today so we can schedule your free consultation.</strong></p>]]></content><author><name>Matthew Cardarelli</name></author><category term="blog" /><category term="news" /><summary type="html"><![CDATA[This blog post is out of date! Please visit the Fractional Plan Pricing page for up-to-date information.]]></summary></entry><entry><title type="html">Client stories: An ETL pipeline for Every Voice</title><link href="https://matthewcardarelli.com/blog/client-stories/2024/04/05/every-voice-legislation-pipeline.html" rel="alternate" type="text/html" title="Client stories: An ETL pipeline for Every Voice" /><published>2024-04-05T00:00:00-04:00</published><updated>2024-04-05T00:00:00-04:00</updated><id>https://matthewcardarelli.com/blog/client-stories/2024/04/05/every-voice-legislation-pipeline</id><content type="html" xml:base="https://matthewcardarelli.com/blog/client-stories/2024/04/05/every-voice-legislation-pipeline.html"><![CDATA[<p>In this client story, I collaborate with a startup founder, taking some back-end development work of their hands. In the process, I get my first exposure to the Google Cloud Platform ecosystem, and do a tiny bit of performance engineering to accomodate the rather strict rate limit of an external API.</p>

<h2 id="the-situation">The situation</h2>

<!-- prettier-ignore-start -->
<p><a href="https://www.counteveryvoice.org/" target="_blank&quot;, rel=&quot;noopener noreferer">Every Voice</a><!-- prettier-ignore-end -->
 is a B-corporation headquartered in Brooklyn, New York. They are developing mobile apps for iOS and Android that are, in their own words, “empowering transparency in democracy.” The apps allow constituents to share demographics, vote on polls, and sign petitions, without the need for emails, text or phone calls. Representatives at the federal, state, and local levels can then use aggregated information to inform their decision-making. The app also serves as a hub of information about representatives, upcoming legislation, and more.</p>

<p>With the 2024 U.S. general elections fast approaching, the small team is spread thin trying to get everything ready for launch. One of the founders reached out to me through a referral from a mutual contact. They needed a developer to build an ETL pipeline that would periodically fetch the latest bill updates from the <!-- prettier-ignore-start --><a href="https://api.congress.gov/" target="_blank&quot;, rel=&quot;noopener noreferer">Congress.gov API</a><!-- prettier-ignore-end -->
 and load them into their NoSQL database. Delegating this work would free up the rest of the team to focus on other aspects of the app, such as the user experience.</p>

<h2 id="the-pitch">The pitch</h2>

<p>Jackson, the founder who acted as my point of contact throughout this project, had already documented a pipeline architecture in a Confluence wiki page. For the most part, my pitch mirrored this proposed technical design. However, I knew I could bring more value to this project that just following instructions. In my proposal, I identified several challenges which surfaced during my preliminary research into Google Cloud and the Congress.gov API. Here they are, straight from the proposal document:</p>

<blockquote>
  <ul>
    <li>A standard Congress.gov API key is limited to 1,000 requests per hour. The endpoints for
fetching bill batches by date range only return a fraction of the information available for each
bill, and impose a pagination limit of 250 bills per request. Fetching full information for a bill
will require several more calls for each bill: one to the single bill resource endpoint, and one
more for each desired sub-resource (bill text, amendments, etc.). The pipeline should be built
to work around these limitations with minimal sacrifices.</li>
    <li>Any part of the pipeline may fail during a run, including a request to extract bill data, or an
attempt to write to the database. The pipeline should log, and possibly alert, all failures, and
implement a suitable retry mechanism to minimize manual intervention.</li>
    <li>The pipeline should be idempotent, meaning that subsequent requests to process bills for
the same date range should result in the same final state of the database documents
(presuming the source data has not changed). The pipeline should not produce duplicate
documents of the same bill in the database.</li>
    <li>The pipeline needs to perform well at scale, which depends on the span of the date ranges
requested in a single run, and by the number of bills last updated within that range. Load
testing will be important to verify the feasibility of the solution.</li>
    <li>To provide future project contributors an optimal experience, the pipeline should be well-documented.
The documentation + the source code for cloud functions should be stored in a
cloud repository owned by Every Voice.</li>
  </ul>
</blockquote>

<p>As with other projects, I highlighted four potential risks up-front, along with mitigation strategies:</p>

<blockquote>
  <p><strong>Work done outside developer’s area of expertise.</strong> While I have Python experience, Python
data pipelines are not my specific area of expertise. To that end, I’ll consult with you closely
as I work, and research best practices as needed.</p>

  <p><strong>Excessive spending on cloud services.</strong> Google Cloud is a powerful cloud platform, but it’s
easy to build expensive solutions if you aren’t careful. I am aware of this risk and will factor
cloud pricing costs into any solution I build by leveraging Google’s pricing calculator tools. I’ll
try to provide an accurate estimate of the cost to run the pipeline at the end of the project.</p>

  <p><strong>Poor pipeline performance.</strong> Software solutions are only worthwhile if they can solve a
problem at the necessary scale. I’ve identified the primary scaling factors to be the size of the
requested date range and, more specifically, the number of bills included in that range. I’ll
test the pipeline with large ranges and large sets of bills to determine the performance.</p>

  <p><strong>Dissatisfaction with progress.</strong> Despite my best efforts, you may be dissatisfied with my
progress and wish to terminate the project. I offer all new clients a no-hassle cancellation
policy so you don’t feel trapped in a contract.</p>
</blockquote>

<h2 id="project-highlights">Project highlights</h2>

<p>The highlights I’ve chosen from this project demonstrate the growth and maturity I’ve gained as a developer compared to my first years in the industry. My clients can expect a holistic, big-picture approach to software development that considers important factors such as error recovery and performance, without overcomplicating the solution.</p>

<h3 id="do-one-thing-and-do-it-well">Do one thing, and do it well</h3>

<figure class="img-fullwidth">
<img is="click-to-view" src="/assets/img/blog/client-stories_every-voice-legislation-pipeline_architecture.jpg" />
<figcaption class="minor-content">A high-level diagram of the Every Voice legislation pipeline infrastructure. A pipeline run is triggered by a scheduled or manually dispatched event. The event passes through a Pub/Sub topic into the first cloud function, which accepts the input date range and fetches all bills in that range. For each bill it finds, it sends a task to the Task queue. The queue dispatches tasks to a second cloud function, which fetches data for the specific bill and loads it idempotently into the database.</figcaption>
</figure>

<p>My approach to this solution embraced that timeless kernel (hehe) of Unix wisdom: “do one thing, and do it well.” The original design of the system consisted of three main parts:</p>

<ol>
  <li>A “Pub/Sub” event topic which triggers…</li>
  <li>A Cloud Function which fetches bill data, transforms the data, and loads it into…</li>
  <li>A Firestore database</li>
</ol>

<p>I proposed one key change: splitting the Cloud Function into two functions, intermediated by a Cloud Tasks queue. The first function executes once per pipeline event to fetch the list of recently added/updated bills. The second executes once per bill to fetch bill-specific data and commit it to the database. Between these two functions sits the Cloud Tasks queue which provides important auxiliary features such as automatic retries and rate limiting.</p>

<p>Thanks to this modification, each function implementation remained relatively lean and easy to comprehend, since it had only one “job” to do.</p>

<h3 id="optimizing-for-rate-limits">Optimizing for rate limits</h3>

<p>As called out in my proposal, the biggest bottleneck in terms of performance was the 1,000 requests-per-hour rate limit imposed by the Congress.gov API. The API’s design amplified this problem. For one thing, the API resource for fetching a list of bills returned at most 250 per request, and only returned basic information about a bill. To get the list of bill cosponsors, the bill’s full text URL, and other key properties required five separate requests for each bill! As a consequence, our pipeline could process, at the very most, 200 bills per hour. If we exceeded that limit, we’d receive a 429 error, and too many violations could result in the revocation of API access.</p>

<p>Fortunately, Every Voice planned to run the pipeline once per week. Fortunately for us, the historic bill counts over weekly date ranges rarely exceeded 1,000 bills, so a pipeline run could load all bills in a few hours, IF the pipeline was properly configured. To do that, I needed a little math:</p>

<div class="language-plaintext highlighter-rouge"><div class="highlight"><pre class="highlight"><code>1,000 req per hour / 5 req per task
= 200 tasks per hr

200 tasks per hr / (3600 sec per hr)
~ 0.055555555 tasks per sec

round down to 0.055 tasks per sec
= 3.3 tasks per min
= 198 tasks per hr
~ 18.18 sec per task
</code></pre></div></div>

<p>Setting our queue’s max dispatch rate to 0.055 establishes an upper limit of 198 tasks dispatched per hour. That is pretty close to our theoretical maximum of 200.</p>

<p>Another important rate of concern was the rate that we enqueue tasks onto our queue. Unlike when we dispatch tasks from the queue, we aren’t worried about the Congress.gov API’s rate limit. Since we can fetch 250 bills per request, we’ll only need a half-dozen requests. However, if we try adding all of those tasks to our queue as fast as possible, we could overwhelm the system.</p>

<p>Google provides guidance for <!-- prettier-ignore-start --><a href="https://cloud.google.com/tasks/docs/manage-cloud-task-scaling#queue" target="_blank&quot;, rel=&quot;noopener noreferer">managing scaling risks</a><!-- prettier-ignore-end -->
, which I’ll summarize here:</p>

<ul>
  <li>Enqueue no more than 500 tasks per second for the first 5 minutes</li>
  <li>Increase that rate by no more than 50% every subsequent five minutes</li>
  <li>Keep combined task operations (enqueue + dispatch) under 1000 per second to avoid latency increases</li>
</ul>

<p>To control the task creation rate, I implemented a rudimentary throttling behaviour in the Cloud Function. The algorithm follows these steps:</p>

<ol>
  <li>Initialize a variable called <code class="language-plaintext highlighter-rouge">batch_size</code> to the value <code class="language-plaintext highlighter-rouge">500</code>.</li>
  <li>Initialize a variable to track our time elapsed.</li>
  <li>Loop through our first 500 fetched bill, creating a task for each one and updating time elapsed.</li>
  <li>After every 50 tasks created, compare the time elapsed to our maximum rate limit of 500 tasks per second.</li>
  <li>If the rate has exceeded our limit, sleep for just long enough to bring our actual rate down to the maximum.</li>
  <li>When a batch completed, check if five minutes has elapsed since the last change to <code class="language-plaintext highlighter-rouge">batch_size</code>. If so, increase <code class="language-plaintext highlighter-rouge">batch_size</code> by 50%, up to a maximum of <code class="language-plaintext highlighter-rouge">1000</code>.</li>
</ol>

<p>An example probably helps here. If we’ve created 250 tasks out of a batch of 500, we need at least 500 milliseconds (0.5 seconds) to elapse, since our maximum rate is 500 tasks per second and we’ve created half of our batch so far. If we find that only 300 milliseconds (0.3 seconds) have elapsed, we throttle our process for 200 ms in order to achieve an acceptable rate.</p>

<h2 id="areas-of-improvement-logging-and-monitoring">Areas of improvement: Logging and monitoring</h2>

<p>This is a longstanding gap in my developer expertise that I really need to invest in soon. Console logs and print statements help with local development debugging, but critical cloud applications require detailed, methodical logging and alerting. My limited knowledge of Google Cloud’s logging and auditing capabilities left me combing through slow, cluttered, verbose log feeds. This could be avoided if I had a better understanding of how to capture and filter the signals from within the noise.</p>

<h2 id="final-takewaway">Final takewaway</h2>

<p>I enjoyed every aspect of this project, including the opportunity to dip my toes into the Google Cloud ecosystem. I’m grateful to Every Voice for reaching out and trusting me with a critical aspect of their infrastructure, and I hope to work with them again in the future!</p>

<p><strong>Need an experienced developer to deliver innovative cloud solutions? <a href="/contact.html">Contact me</a> today so we can schedule your free consultation.</strong></p>]]></content><author><name>Matthew Cardarelli</name></author><category term="blog" /><category term="client-stories" /><summary type="html"><![CDATA[]]></summary></entry><entry><title type="html">Client stories: Designing and Deploying a Healthcare Database</title><link href="https://matthewcardarelli.com/blog/client-stories/2024/03/27/aretetic-db-deployment.html" rel="alternate" type="text/html" title="Client stories: Designing and Deploying a Healthcare Database" /><published>2024-03-27T00:00:00-04:00</published><updated>2024-03-27T00:00:00-04:00</updated><id>https://matthewcardarelli.com/blog/client-stories/2024/03/27/aretetic-db-deployment</id><content type="html" xml:base="https://matthewcardarelli.com/blog/client-stories/2024/03/27/aretetic-db-deployment.html"><![CDATA[<p>It’s good to be busy! I’ve spent the first quarter of 2024 sinking my teeth into a few exciting projects. Being fully booked is great for business, but not for blogging! Now that the dust has settled, I finally have some quiet time to document the highlights of the past three months.</p>

<p>The project I’m about to discuss took me back to my software developer roots in the healthcare industry, but also challenged me to upskill in short order.</p>

<h2 id="the-situation">The situation</h2>

<!-- prettier-ignore-start -->
<p><a href="https://aretetic.com/" target="_blank&quot;, rel=&quot;noopener noreferer">Aretetic Solutions</a><!-- prettier-ignore-end -->
 approached me in February with a dilemma. They were providing support and services to a healthcare tech platform whose main clients were groups serving people with rare diseases. The groups could create and administer surveys to their members in order to collect both demographic and healthcare information, which could then be accessed, with proper consent and approval, by researchers trying to learn more or develop treatments for these diseases. Unfortunately, the company behind the platform went bankrupt. Per their terms, after just 30 days they were allowed to delete all the data, permanently. This would obviously have a major impact on the groups and the members they serve.</p>

<p>Aretetic approached me seeking a full-stack developer who could stand up a secure, GDPR-compliant cloud database to house the survey data, and also help with the migration of the data from the old platform.</p>

<h2 id="the-pitch">The pitch</h2>

<p>In true programmer fashion, I’m going to copy-paste the introduction section of my proposal document, because it will save me some typing, and because it does an excellent job summarizing my proposal to Aretetic.</p>

<blockquote>
  <blockquote>
    <blockquote>
      <p>In the world of modern healthcare, secure tools to manage patients’ personal health information
are essential. The challenge for many healthcare tech projects is striking the right balance
between security, accessibility, and cost effectiveness. Patients, and everyone supporting their
care, need information to be up-to-date and readily accessible, yet protected from any sort of
unauthorized access. These kinds of systems can be expensive to build, but costs can be
managed through judicious prioritization of the most important features.</p>

      <p>I will deploy a relational database in a HIPAA-compliant cloud environment that can store health
and demographic information for the patients your organization serves. This database will live
inside a private cloud network, cut off from the public internet. Access to the database will be
restricted by role-based user access policies implemented inside the cloud provider console, as
well as a VPN gateway or bastion host for developer access.</p>

      <p>In future projects, you could invest in additional features, such as an API gateway and web
interface that would allow users to log in and edit their own PHI.</p>
    </blockquote>
  </blockquote>
</blockquote>

<p>My proposal also broke down the key components of the new system architecture. There were:</p>

<ul>
  <li>The relational database</li>
  <li>The “virtual private cloud,” which isolates the database from the public internet</li>
  <li>The secure endpoint to allow administrative access to the private cloud from the outside world</li>
  <li>A database backup plan, to avoid data loss in the event of a disaster</li>
  <li>A batch script to read files containing exported data from the old platform, and write to the new database</li>
</ul>

<p>Finally, I identified the potential risks of the project, and my approaches to mitigating those risks. Here’s the verbatim text copied from that section:</p>

<blockquote>
  <blockquote>
    <blockquote>
      <p><strong>Legal compliance.</strong> The transmission and storage of personal health information (PHI) is
subject to a host of laws and regulations. I will take note of any regulations you identify to
me, adhere to them myself during development, and contact the cloud provider to confirm
the compliance of any products this project uses.</p>

      <p><strong>Data loss.</strong> Any storage solution poses a risk of failure at any time, whether due to faulty
hardware, defective software, or a cyberattack. I will work with you to establish a suitable
backup and restore plan prior to development.</p>

      <p><strong>Unauthorized access.</strong> PHI is highly sensitive information. Improper access can cause serious
harm to the subject and others. I will apply a zero-trust security policy to the performance of
this project, which involves granting the minimal required authorizations requested by anyone
who needs access to the system, or the data within it. It also means I will use spoofed sample
data wherever possible during development and testing, to reduce my own access to real
user data.</p>

      <p><strong>Liability.</strong> In spite of my commitment to due diligence, I am not immune to mistakes. I carry
general and professional liability to protect myself and my clients from damages caused by
errors and omissions in my work.</p>

      <p><strong>Project risk.</strong> Every software development project is subject to time and budget constraints. I
cannot guarantee project completion by a certain date. However, I offer fixed quote pricing,
and will continue working beyond the estimated completion date at no additional client cost. I
can also prioritize projects on a tight deadline for an additional percentage fee.</p>
    </blockquote>
  </blockquote>
</blockquote>

<h2 id="project-highlights">Project highlights</h2>

<p>Here are several highlights from my work. As always, I’ve focused on my approach and decision making over specific technical minutia.</p>

<h3 id="locking-down-the-virtual-network">Locking down the virtual network</h3>

<figure class="img-fullwidth">
<img is="click-to-view" src="/assets/img/blog/client-stories_aretetic-db-deployment_aws.jpg" />
<figcaption class="minor-content">A high-level diagram of the AWS infrastructure. The VPC prevents public access to the database, while the EIC endpoint allows authorized users to connect to the EC2 instance via SSH, which can access the RDS database via port forwarding. Security groups with strict IP rules ensure that even authorized users are unable to snoop around the VPC or private subnet.</figcaption>
</figure>

<p>This was a top priority of mine, and one of the most time-consuming aspects of the job due to my relative inexperience with the AWS ecosystem. I knew I needed to deploy the database in a Virtual Private Cloud (VPC), to protect it from brute-force attacks and other exploits my malicious actors on the public internet. But I also knew that the Aretetic administrator, working from a computer outside the VPC, needs to connect to the database and run the migration script. After extensive research, I identified three potential solutions:</p>

<ul>
  <li>A “<strong>bastion host</strong>,” a server inside the VPC yet publicly accessible, with SSH capabilities. Only users with SSH public keys loaded onto the bastion host can connect to it. Once connected, users can utilize ssh port-forwarding to access select private resources within the VPC. Rules defined in the AWS security groups regulate the resources the bastion host can access.</li>
  <li>A “<strong>virtual private network</strong>” (VPN) connection. Users install a client such as OpenVPN, then establish a connection to the VPN server, which lives inside the VPC but is exposed via an internet gateway, similar to the bastion host. Once a connection is established, the user’s device is effectively “inside” the VPN and can access all resources.</li>
  <li>A newer AWS feature called an <strong>EC2 Instance Connect Endpoint</strong> (EIC Endpoint). This is also known as an “identity-aware proxy.” Like a bastion host or VPN server, the EIC endpoint acts as a bridge between the VPC and outside world. However, the EIC endpoint does not accept basic HTTP or SSH requests. Instead, a user authenticates with an identity provider configured inside the AWS account, and receives an access token in return. This token is passed to the EIC endpoint. If the user passes a valid token, and has the appropriate IAM authorization to connect via EIC Endpoint, the endpoint creates a temporary public key pair that enables the user to connect to the EC2 host via SSH for the duration of the session.</li>
</ul>

<p>Each solution had pros and cons. The bastion host is easy to setup, but requires an experienced administrator to lock down properly. Even more work is required to audit user sessions, and to periodically expire credentials via public key rotation. The VPN connection is convenient, but in addition to similar limitations regarding user audits and credential duration, it also does not allow fine-grained control of access to resources inside the VPC. The EIC endpoint turned out to be the best option. It permits a zero-trust approach via integration with AWS IAM roles and temporary access credentials, and it does not require any VPC gateway to the public internet.</p>

<p>Setting up this solution turned out to be an ordeal, mostly due to human error. Six hours and one mistyped IP address later, the EIC endpoint was working!</p>

<p><em>Do you want a tech blog post explaining how to set this up? Let me know!</em></p>

<h3 id="modeling-data-for-backwards-compatibility-and-future-flexibility">Modeling data for backwards compatibility and future flexibility</h3>

<p>I’ve been working with relational databases and the SQL language for the entirety of my developer career. This project was a landmark, however, as my first opportunity to model and implement the entire schema of a database. The requirements posed two challenges that proved to be somewhat at odds. On the one hand, the database needed to accomodate the legacy data from the old platform. On the other, no one actually liked the schema of the old system, and would likely want to change how things work in the future.</p>

<p>To tackle these conflicting requirements, I constructed a schema comprised of three key tables:</p>

<ul>
  <li>The “Member” table represents a user who may respond to surveys.</li>
  <li>The “Survey” table represents a single survey that members may respond to.</li>
  <li>The “Response” table represents a single occurrence of a user responding to a survey, at a moment in time. A single user might respond to a survey multiple times if their answers to the questions have changed.</li>
</ul>

<p>To accomodate the legacy data, I added a two accessory tables. Each row in the first table created a one-to-one relationship between a “participant identifier” from the legacy platform and the id of a general “Member.” Each row in the second table represented a single survey question and corresponding user answer, which included a foreign key to a single “Response” row. By doing this, Aretetic could import the legacy data as soon as possible, without locking themselves into any specific database structure for storing future survey questions and answers.</p>

<p>The real value of a relational database is its ability to enforce data integrity. Using carefully defined constraints and triggers, I added some useful features to the schema. For example, a survey cannot be accidentally deleted if it has linked responses; an admin would need to intentionally delete all responses in the database before deleting the survey. Additionally, if a “Member” row is deleted, all “Response” rows linked to that member are also deleted (which also cascades to individual question-answer rows). This helps Aretetic accomodate GDPR requests from users to delete their data. Of course, a routine database backup plan provides a recovery path in case a user is deleted erroneously.</p>

<h3 id="automation-infrastructure-deployment">Automation infrastructure deployment</h3>

<p>When I’m deploying code and infrastructure for a client, it’s important that my steps are easily replicable. This isn’t just for my own benefit, either. As I’ve written before, I strongly oppose vendor lock-in as a customer, and I apply that same philosophy to my own clients. If they decide to hire different developers in the future, I want those contributors to have everything they need to support the platform.</p>

<p>I created a pair of Terraform modules to automate deployment and configuration of the AWS infrastructure, which I’ve pushed to the client’s repository. The tooling certainly saved me time, especially while debugging issues with networking configurations. But more importantly, even future contributors who are unfamiliar with Terraform or choose to deploy manually can read my Terraform configuration files as a blueprint documenting the way I set things up.</p>

<h3 id="scripting-the-data-migration">Scripting the data migration</h3>

<p>At first, I assumed the import process could be done manually with SQL client and a few insert statements. My stance flipped when I learned the volume of data: 50+ files with hundreds of responses per file. The export also split each survey into two files: a plain CSV containing the survey metadata, and a password-protected Excel spreadsheet containing the actual responses. The CSV file was formatted strangely, with the first 7 columns representing survey-level data (populated only on row 1), while the remaining columns contained question-level data (populated on many rows). The Excel data wasn’t much better: Each row was a single response, which was fine. The first column was the participant identifier. After that, every column header contained the full text of the question, with users’ answers in the cells below. Every survey response file had a different number of columns.</p>

<p>Suffice to say, automation was necessary.</p>

<p>Since the Aretetic admin would be running the migration, I needed to write the script in a runtime environment familiar to them. Fortunately, we both knew some Python. In addition to ease of use, Python’s power comes from it’s incredible standard library and third-party package repository. Before and while writing the migration script, I carefully curated a list of well-maintained package dependencies. Shoutout to the maintainers of the following packages for saving me countless hours’ worth of work:</p>

<ul>
  <li><code class="language-plaintext highlighter-rouge">petl</code>: This data pipeline library was really easy to work with, even for someone with zero big data experience. It made extracting, transforming, and loading the data a snap.</li>
  <li><code class="language-plaintext highlighter-rouge">openpyxl</code>: This library integrates with petl to load Excel spreadsheets into memory.</li>
  <li><code class="language-plaintext highlighter-rouge">msoffcrypto-tool</code>: This nifty library can unlock password-protected spreadsheets, which can then be fed into openpyxl.</li>
  <li><code class="language-plaintext highlighter-rouge">psycopg</code>: The wonderful PostgreSQL python driver.</li>
</ul>

<p>Fortunately, I managed to provide the admin a pretty solid user experience, as far as CLI scripts go. They only needed to pass the script the paths of the two export files for the survey, as well as the survey’s name to store in the database. Then, they’d be prompted for the password to unlock the XLSX file. The script included rudimentary data validation that would report an error if something looked wrong. And, it was idempotent, meaning they could safely re-run it after a failure without worrying about duplicating data. This last point proved particularly useful when the 1-hour session limit for EIC Endpoint connections would expire in the middle of a migration (a distinct downside of the EIC Endpoint strategy).</p>

<h2 id="areas-of-improvement-avoiding-waterfall-development">Areas of improvement: avoiding waterfall development</h2>

<p>If there’s one thing I wish I could do over on this project, it would be requirements gathering. The initial sample data I received was only half of the data I needed (the responses, not the survey metadata). Additionally, I didn’t inquire about the volume of data until late into the project. This resulted in some painful pivots, including a partial revision of the database schema, and a couple late night crunch sessions writing a migration script far more complex than I had planned. More frequent check-ins with my point of contact could have exposed my false assumptions earlier in the process, saving me time and effort. As a former Scrum Master and Tech Lead, I ought to know that!</p>

<h2 id="final-takewaway">Final takewaway</h2>

<p>This project was both fulfilling and a great boost in confidence! I’m glad I could help Aretetic, as well as everyone who depends on the data we salvaged. At the same time, I proved to myself that my versatility and adaptability extends beyond development into the world of <strong>cloud infrastructure</strong>, <strong>software architecture</strong>, and <strong>database design</strong>. I’m looking forward to partnering with Aretetic in the future to help them extend the functionality and features of their new platform!</p>

<p><strong>Need an experienced developer to deliver innovative cloud solutions? <a href="/contact.html">Contact me</a> today so we can schedule your free consultation.</strong></p>]]></content><author><name>Matthew Cardarelli</name></author><category term="blog" /><category term="client-stories" /><summary type="html"><![CDATA[]]></summary></entry><entry><title type="html">Client stories: React App Groundwork</title><link href="https://matthewcardarelli.com/blog/client-stories/2023/12/28/react-app-foundation.html" rel="alternate" type="text/html" title="Client stories: React App Groundwork" /><published>2023-12-28T00:00:00-05:00</published><updated>2024-02-10T18:26:00-05:00</updated><id>https://matthewcardarelli.com/blog/client-stories/2023/12/28/react-app-foundation</id><content type="html" xml:base="https://matthewcardarelli.com/blog/client-stories/2023/12/28/react-app-foundation.html"><![CDATA[<p>I have another client story to share today. This was actually my first project as Matthew Cardarelli Solutions, which I completed back in October of this year. This client has requested confidentiality, but they authorized me to discuss the project in generic terms, which I greatly appreciate.</p>

<p><em>Any and all quotes, excerpts, and code snippets you read here have been modified to prevent disclosure of confidential client information.</em></p>

<h2 id="the-situation">The situation</h2>

<p>This client needed to replace a cloud software solution they were paying to use. Instead of buying a new tool, they chose to invest in their own internal application. The application’s primary purpose is to perform scheduled data imports and exports. This process is executed by a server-side service connected to a relational database. The service exposes configuration operations via a REST API, and a web interface allows authorized users to easily configure and administer the system.</p>

<p>The client already contracted a pair of developers to build the back-end service, but they needed someone with front-end experience to build the web interface.</p>

<h2 id="the-pitch">The pitch</h2>

<p>During our initial consultation, I learned about the nature of the business problem, the vision for the solution, and the planned technology stack. When the client mentioned that they had bootstrapped the user interface with React, I knew I was the right developer for the job. While I consider myself a full-stack web developer, I spent most of my last full-time role building and maintaining React-based web browser interfaces, and more specifically, building table-and-form administration workflows. My skillset was a great match for their needs.</p>

<p>Donning my project manager cap, I identified the most essential pages and features discussed during the consultation, translated it into a list of acceptance criteria statements, and composed a proposal document.</p>

<p>Here is a sample of the acceptance criteria, which includes some of the more generic features that one would expect from any web interface. The phrasing of the first sentence is intended to keep the focus on the client outcomes that will result from my work, rather than the work to be done.</p>

<blockquote>
  <p>The Developer is responsible for ensuring that the web application meets the following
acceptance criteria:</p>

  <ul>
    <li>Users can attempt to log in to the application.</li>
    <li>Users can successfully log in and receive an access token.</li>
    <li>The user is prompted if their attempt to log in results in an error.</li>
    <li>etc…</li>
  </ul>
</blockquote>

<p>In addition to the requirements, my proposal included an estimated timeline and a fixed price quote. Together, these three elements communicate a clear value proposition, which simplifies a client’s cost-benefit analysis. My proposal is a success if a client can easily ask themselves, “In approximately X days/weeks/months, progress towards my business goals will be furthered by A, B, and C. Is that worth the fee of Y dollars to me?”</p>

<p>In this case, my client agreed to the initial proposal, without a need for further negotiation. That is a win-win for both of us! The “starter project” has quickly become my preferred model for all new clients, because it’s low risk to them, and allows me to demonstrate my competence far better than a resume or even a portfolio can.</p>

<h2 id="dev-environment-setup">Dev environment setup</h2>

<p>I wasn’t quite starting from square one. As I mentioned, the other contractors had configured a very basic React app starter. In order to test the project end-to-end, I also needed to run the API server locally, which meant setting up a database.</p>

<p>It was clear to me already that, as this was an enterprise cloud application, I would not be the only developer working in this repository forever. Therefore, as I set up my environment I made small contributions to simplify new contributor onboarding, without hiding everything behind some magical do-it-all setup script.</p>

<p><em>(as it turns out, this benefitted me directly when I purchased a new work laptop and needed to set up the repository again)</em></p>

<h3 id="locking-down-the-node-version">Locking down the node version</h3>

<p>For collaborative projects, it’s important to maintain consistency between local and production environments, as well as different contributor’s development environments. To that end, I added an <code class="language-plaintext highlighter-rouge">.nvmrc</code> file to the repo and added a few lines to the README reminding developers to set up a version manager for their node runtime. My tool of choice these days for node version management is actually <!-- prettier-ignore-start --><a href="https://asdf-vm.com/" target="_blank&quot;, rel=&quot;noopener noreferer">asdf</a><!-- prettier-ignore-end -->
, rather than nvm. I prefer <code class="language-plaintext highlighter-rouge">asdf</code> for a couple reasons:</p>

<ul>
  <li>It’s easier and less invasive to install and uninstall.</li>
  <li>Its plugin architecture supports many languages, not just <code class="language-plaintext highlighter-rouge">nodejs</code>.</li>
</ul>

<h3 id="containing-the-database">Containing the database</h3>

<p>Up until recently, when I needed a server-side package such as Nginx or PostgreSQL, I’d simply use my package manager to install whatever version my operating system currently supported. This of course led to conflicts when different projects called for different versions of a system package. As an independent developer working with multiple clients, I realized this problem would only grow over time. I took this opportunity to finally learn some container basics.</p>

<p>Instead of installing the database directly to my local machine, I setup <!-- prettier-ignore-start --><a href="https://docs.podman.io/en/latest/" target="_blank&quot;, rel=&quot;noopener noreferer">Podman</a><!-- prettier-ignore-end -->
 on my machine, pulled the official Docker image, and booted up a container. I mounted the folder containing the database seeding scripts so seed the database with test data with a couple quick commands. And, of course, I documented all the commands in the README in case other developers wanted to follow the same strategy.</p>

<h2 id="project-highlights">Project highlights</h2>

<p>The scope of work for this project required me to:</p>

<ul>
  <li>Test the UI side of the user login functionality, and fix it if it isn’t working.</li>
  <li>Allow logged-in users to editing details about themselves, such as their name and email.</li>
  <li>Implement a logout button.</li>
  <li>Build a “list view” page for each of the primary resource types accessible via the API.</li>
  <li>Set up automated testing infrastructure for local development.</li>
</ul>

<p>The actual development of the React application turned out to be relatively straightforward. The starter was incorporated the <!-- prettier-ignore-start --><a href="https://mui.com/material-ui" target="_blank&quot;, rel=&quot;noopener noreferer">Material UI</a><!-- prettier-ignore-end -->
 component library (MUI), which did a lot of heavy lifting for me. It did take me a while to get familiar with MUI’s patterns and best practices for customizing components, but once I got the hang of things my development pace sped up substantially.</p>

<p>The purpose of this blog post is <em>not</em> to bore you with day-to-day technical minutia. Instead of a step-by-step, I will summarize important aspects of my approach, including the “why” behind my actions. Here are some of the highlights of my work.</p>

<h3 id="make-it-work-then-make-it-right">Make it work, then make it right</h3>

<p>I tend to be a bit of a perfectionist. This can be both a boon and a curse when developing software. One habit I’ve worked hard to break is the temptation to implement each feature pixel-perfect before moving on to the next. For this project, falling prey to perfectionism could put the timeline, and my reputation, at risk. To change my behavior, I chose a motto to repeat in my head: “Make it work, then make it right.”</p>

<p>In practice, I implemented the bare miniumum necessary to check off each of the acceptance criteria included in the proposal. Once a feature functioned, however ugly and fragile, I’d move on to the next feature. Only after I completed the critical feature set, did I go back to refine and improve the code.</p>

<p>This approach proved highly successful. By focusing on the absolute essentials first, I immediately eliminated many potential unknowns, including which of my planned approaches would work and which I would need to reconsider. I also surfaced many questions to the API developers early on, giving them plenty of time to respond or make changes. Best of all, as I neared the end of the project timeline, the work that might need to be cut consisted of small “nice-to-haves”, rather than major “must-haves.”</p>

<h3 id="flattening-the-document-hierarchy">Flattening the document hierarchy</h3>

<p>The existing UI code relied heavily on the generic <code class="language-plaintext highlighter-rouge">&lt;Box&gt;</code> MUI component to manage layout and styling. While simple to apply, this approach has drawbacks, such as:</p>

<ul>
  <li>Verbose markup that can be hard for a developer to parse.</li>
  <li>A lack of semantics in the document structure.</li>
</ul>

<p>I took a different approach for the new code I wrote, as well as the refactors I performed on existing components:</p>

<ul>
  <li>I relied on styling components directly where possible, rather than wrapping them in a <code class="language-plaintext highlighter-rouge">&lt;Box&gt;</code>.</li>
  <li>I used the MUI <code class="language-plaintext highlighter-rouge">&lt;Stack&gt;</code> and <code class="language-plaintext highlighter-rouge">&lt;Grid&gt;</code> components when I needed a flexbox or grid layout, respectively.</li>
</ul>

<p>I believe this approach results in more legible code, and a more semantically rich application. Though I suppose I am a bit biased!</p>

<h3 id="fixing-the-router">Fixing the router</h3>

<p>The app used React Router for navigation between pages, but the back-end developer who set up the starter mentioned that they couldn’t get it working, though they didn’t have much time to do so. It didn’t take me long to discover the issue. The page header component was rendering outside of the <code class="language-plaintext highlighter-rouge">&lt;RouterProvider&gt;</code>. Thus, it couldn’t actually message the provider when a navigation event occurred. It took a bit of refactoring, but I managed to move the header under the router provider without triggering unnecessary re-rendering.</p>

<p>To aid new contributors, I updated the README with instructions for how to create a new route.</p>

<h3 id="trimming-the-third-party-package-web">Trimming the third-party package web</h3>

<p>I have a strong disdain for most project “starter” repositories. <code class="language-plaintext highlighter-rouge">create-react-app</code> is the primary offender. My main complaint is that, instead of teaching you how to quickly assemble your tools and development environment, they act as a magical black box that “just works.” As a consequence, it’s painful and sometimes nearly impossible to change how things work when your project outgrows the defaults.</p>

<p>They also tend to bundle a lot of third-party libraries you may or may not need. Dependencies are expensive additions to your project. Yes, they save you time reinventing the wheel, but each dependency needs to be monitored for security patches and maintainer abandonment. Plus, unused dependencies bloat the development environment and slow down fresh installations.</p>

<p>This project used a starter created by one of the back-end dev’s colleagues, and honestly, it wasn’t so bad. I ended up keeping most of the packages, and I trimmed a dozen or so. I also swapped out the <code class="language-plaintext highlighter-rouge">moment</code> library for the more actively developed <code class="language-plaintext highlighter-rouge">date-fns</code>.</p>

<h3 id="declarative-api-data-fetching">Declarative API data fetching</h3>

<p>Given the RESTful nature of the API, and the dynamic nature of the user interface I was building, I imported Vercel’s <code class="language-plaintext highlighter-rouge">swr</code> library to implement API fetching. I used <!-- prettier-ignore-start --><a href="https://swr.vercel.app/" target="_blank&quot;, rel=&quot;noopener noreferer">SWR</a><!-- prettier-ignore-end -->
 at my last job, but not directly. The hooks was hidden under abstraction layers that provided impressive type safety for a large organization, at the cost of obfuscating the behaviors and advantages of the SWR library. Using SWR directly for this project gave me new appreciation for its power and versatility.</p>

<p>I organized the fetch hooks in a subfolder called <code class="language-plaintext highlighter-rouge">src/hooks/api</code>. Each hook corresponded to a specific API endpoint. Thanks to SWR’s global caching mechanisms, I could pull these hooks in wherever I needed the data from an API call, and not worry about duplicating the same request.</p>

<p>What I found most interesting was how, at least for now, I could manage a user’s authenticated state (logged in or logged out) without needing to use React context. Instead, I defined an SWR hook for the API endpoint responsible for returning the logged in user’s data, and extended the polling interval for refetching. Anywhere in the app that needed the user’s authenticated state or logged in user data could simply pull in the hook. When a user performed an explicit log in or log out, I used SWR’s built in mutation methods to force a cache revalidation.</p>

<p>Here’s a look at the user authentication hook:</p>

<figure class="highlight"><pre><code class="language-typescript" data-lang="typescript"><span class="c1">// @ts-nocheck</span>

<span class="kr">interface</span> <span class="nx">AuthenticatedUserResponseBody</span> <span class="p">{</span>
  <span class="nl">username</span><span class="p">:</span> <span class="kr">string</span><span class="p">;</span>
  <span class="nl">authInstant</span><span class="p">:</span> <span class="kr">string</span><span class="p">;</span> <span class="c1">// datetime stamp of the instant the user logged in</span>
  <span class="nl">userInfo</span><span class="p">:</span> <span class="p">{</span>
    <span class="na">firstName</span><span class="p">:</span> <span class="kr">string</span><span class="p">;</span>
    <span class="nl">lastName</span><span class="p">:</span> <span class="kr">string</span><span class="p">;</span>
    <span class="nl">email</span><span class="p">?:</span> <span class="kr">string</span><span class="p">;</span>
  <span class="p">};</span>
  <span class="nl">roles</span><span class="p">:</span> <span class="kr">string</span><span class="p">[];</span>
<span class="p">}</span>

<span class="kd">type</span> <span class="nx">AuthenticationState</span> <span class="o">=</span>
  <span class="o">|</span> <span class="p">{</span>
      <span class="na">isAuthenticated</span><span class="p">:</span> <span class="kc">false</span><span class="p">;</span>
    <span class="p">}</span>
  <span class="o">|</span> <span class="p">{</span>
      <span class="na">isAuthenticated</span><span class="p">:</span> <span class="kc">true</span><span class="p">;</span>
      <span class="nl">authInstant</span><span class="p">:</span> <span class="nb">Date</span><span class="p">;</span>
      <span class="nl">permissions</span><span class="p">:</span> <span class="nb">Record</span><span class="o">&lt;</span><span class="kr">string</span><span class="p">,</span> <span class="kr">string</span><span class="o">&gt;</span><span class="p">;</span>
    <span class="p">};</span>

<span class="k">export</span> <span class="k">default</span> <span class="kd">function</span> <span class="nf">useAuthenticationDetails</span><span class="p">()</span> <span class="p">{</span>
  <span class="kd">const</span> <span class="p">{</span>
    <span class="nx">data</span> <span class="o">=</span> <span class="p">{</span> <span class="na">isAuthenticated</span><span class="p">:</span> <span class="kc">false</span> <span class="p">},</span>
    <span class="nx">isValidating</span><span class="p">,</span>
    <span class="nx">isLoading</span><span class="p">,</span>
    <span class="nx">mutate</span><span class="p">,</span>
  <span class="p">}</span> <span class="o">=</span> <span class="nx">useSWR</span><span class="o">&lt;</span><span class="nx">AuthenticationState</span><span class="o">&gt;</span><span class="p">(</span>
    <span class="dl">'</span><span class="s1">/api/session</span><span class="dl">'</span><span class="p">,</span>
    <span class="k">async </span><span class="p">(</span><span class="nx">key</span><span class="p">:</span> <span class="dl">'</span><span class="s1">/api/session</span><span class="dl">'</span><span class="p">)</span> <span class="o">=&gt;</span> <span class="p">{</span>
      <span class="kd">const</span> <span class="nx">response</span> <span class="o">=</span> <span class="k">await</span> <span class="nf">fetch</span><span class="p">(</span><span class="nx">key</span><span class="p">);</span>

      <span class="c1">// Assume any failure means the user isn't authenticated</span>
      <span class="k">if </span><span class="p">(</span><span class="nx">response</span><span class="p">.</span><span class="nx">status</span> <span class="o">!==</span> <span class="mi">200</span><span class="p">)</span> <span class="p">{</span>
        <span class="k">return</span> <span class="p">{</span> <span class="na">isAuthenticated</span><span class="p">:</span> <span class="kc">false</span> <span class="p">};</span>
      <span class="p">}</span>

      <span class="c1">// Parse the body and return data in a format meaningful to the UI.</span>
      <span class="kd">const</span> <span class="na">body</span><span class="p">:</span> <span class="nx">AuthenticatedUserResponseBody</span> <span class="o">=</span> <span class="k">await</span> <span class="nx">response</span><span class="p">.</span><span class="nf">json</span><span class="p">();</span>
      <span class="kd">const</span> <span class="na">result</span><span class="p">:</span> <span class="nx">AuthenticationState</span> <span class="o">=</span> <span class="p">{</span>
        <span class="na">isAuthenticated</span><span class="p">:</span> <span class="kc">true</span><span class="p">,</span>
        <span class="na">authInstant</span><span class="p">:</span> <span class="nf">parseISODate</span><span class="p">(</span><span class="nx">body</span><span class="p">.</span><span class="nx">authInstant</span><span class="p">),</span>
        <span class="na">permissions</span><span class="p">:</span> <span class="nf">extractPermissions</span><span class="p">(</span><span class="nx">body</span><span class="p">.</span><span class="nx">roles</span><span class="p">),</span>
      <span class="p">};</span>
      <span class="k">return</span> <span class="nx">result</span><span class="p">;</span>
    <span class="p">},</span>
    <span class="p">{</span>
      <span class="c1">// Since this is used in many places, we don't want it to refetch too often.</span>
      <span class="na">dedupingInterval</span><span class="p">:</span> <span class="mi">30000</span><span class="p">,</span>
    <span class="p">},</span>
  <span class="p">);</span>

  <span class="k">return</span> <span class="p">{</span>
    <span class="na">authState</span><span class="p">:</span> <span class="nx">data</span><span class="p">,</span>
    <span class="nx">isLoading</span><span class="p">,</span> <span class="c1">// true while first fetch is in-flight</span>
    <span class="nx">isValidating</span><span class="p">,</span> <span class="c1">// true whenever a fetch or refetch is in-flight</span>

    <span class="c1">// Used by login component to fetch user session after successful authentication attempt</span>
    <span class="na">revalidateAuthStatus</span><span class="p">:</span> <span class="p">()</span> <span class="o">=&gt;</span> <span class="nf">mutate</span><span class="p">(),</span>
    <span class="c1">// Used by logout component to clear state after successful session logout</span>
    <span class="na">clearAuthStatus</span><span class="p">:</span> <span class="p">()</span> <span class="o">=&gt;</span> <span class="nf">mutate</span><span class="p">({</span> <span class="na">isAuthenticated</span><span class="p">:</span> <span class="kc">false</span> <span class="p">}),</span>
  <span class="p">};</span>
<span class="p">}</span></code></pre></figure>

<h3 id="robust-automated-testing">Robust automated testing</h3>

<p>I ended up configuring four kinds of automated testing:</p>

<ul>
  <li>Cypress end-to-end testing</li>
  <li>Cypress component testing</li>
  <li>Vitest unit testing</li>
  <li>Lighthouse performance and accessibility auditing</li>
</ul>

<p>For each test method, I added instructions in the README for running the tests, as well as what to test with each tool and how to add a new test. I also added at least one useful end-to-end, component, and unit test that would double as an example.</p>

<h2 id="areas-of-improvement-performance-and-accessibility">Areas of improvement: performance and accessibility</h2>

<p>I certainly did not neglect accessbility for this project, but I could have done better. My unfamiliarity with Material UI components left me scratching my head when I was performing screen-reader testing, as I couldn’t understand why certain interactions weren’t working as I expected. I also haven’t yet invested the time to really understand the <!-- prettier-ignore-start --><a href="https://www.w3.org/TR/WCAG22/#abstract" target="_blank&quot;, rel=&quot;noopener noreferer">Web Content Accessbility Guidelines</a><!-- prettier-ignore-end -->
, nor am I familiar with the tools available to assist me in testing sites for accessibility.</p>

<p>On a similar note, I have to admit that while I had no problem getting Lighthouse audits working, I had very little understanding of how to interpret the metrics being displayed. I need to make some time for myself to learn performance engineering concepts so I can apply them to the development projects I’m working on.</p>

<h2 id="final-takewaway">Final takewaway</h2>

<p>I felt great about the results of this project, and so did my client. They have since contracted with me to continue to develop the user interface. I’m also glad to be involved in collaborative development again. It’s been great working together with other capable developers. I’m looking forward to delivering more value for this client in the near future!</p>

<p><strong>Need an experienced developer to deliver innovative web solutions? <a href="/contact.html">Contact me</a> today so we can schedule your free consultation.</strong></p>]]></content><author><name>Matthew Cardarelli</name></author><category term="blog" /><category term="client-stories" /><summary type="html"><![CDATA[]]></summary></entry><entry><title type="html">Client stories: Red Car Analytics</title><link href="https://matthewcardarelli.com/blog/client-stories/2023/12/18/red-car-site-updates.html" rel="alternate" type="text/html" title="Client stories: Red Car Analytics" /><published>2023-12-18T00:00:00-05:00</published><updated>2023-12-28T14:43:00-05:00</updated><id>https://matthewcardarelli.com/blog/client-stories/2023/12/18/red-car-site-updates</id><content type="html" xml:base="https://matthewcardarelli.com/blog/client-stories/2023/12/18/red-car-site-updates.html"><![CDATA[<p>For the first time, I have the opportunity to share some of the work I’m doing through Matthew Cardarelli Solutions. The fine folks over at <!-- prettier-ignore-start --><a href="https://redcaranalytics.com/" target="_blank&quot;, rel=&quot;noopener noreferer">Red Car Analytics</a><!-- prettier-ignore-end -->
 granted me permission to share some details from a project I recently completed for them.</p>

<h2 id="the-situation">The situation</h2>

<p>Red Car Analytics is, according to their website, “…a building energy consulting firm focused on building optimization.” The Red Car website was built in-house by a tech-savvy team member several years ago. That teammate has since left the company. Other team members were pitching in where they could, but a dearth of both time and web development experience caused the site to decay. New content was missing, plugins stopped updating (or updated and caused problems), and page layouts lacked consistency. They needed someone to update the site with their latest achievements and portfolio pieces, improve the general layout and design consistency of the site, and perform some back-end maintenance on their plugins and extensions to improve site stability and performance.</p>

<h2 id="the-pitch">The pitch</h2>

<p>Before this project, I had never worked on a Wordpress site. That said, I know how to learn fast on the job while avoiding the kind of “teachable moments” that could cause my client harm. I also highly value transparency. So, rather than trying to conceal my lack of subject matter expertise during my bid and proposal, I told the truth. In my initial pitch, I explained that I see this project as an excellent learning opportunity for myself, and that I would discount my fee for the project in exchange for a chance to develop some new skills. In my proposal, I broke down the potential risks, and the ways I would mitigate them. Finally, I ensured that the contract included a reasonable early termination policy in case either of us decided this wasn’t the right fit.</p>

<p>I felt comfortable admitting my own limitations because I had confidence in my versatility and judgment, and also because my business strategy relies on converting one-off projects into long-term clients. Transparency is essential to my way of doing business.</p>

<p>I must applaud my point of contact at Red Car for doing some heavy lifting during the proposal stage. They provided their own detailed scope of work document without me even asking, which is not something I ever expect, but something I most certainly appreciate. I synthesized the work they needed done, did preliminary research on Wordpress to valiate the plausability of my approach, and padded my time estimates to account for the high degree of unknown. The time padding was communicated up-front to Red Car.</p>

<p>With business negotiations concluded, it was time for the real work to begin.</p>

<h2 id="accessing-the-site">Accessing the site</h2>

<p>I needed access to a few accounts: The Wordpress admin panel, the web host’s admin panel, and the virtual web server. I could have asked Red Car to hand over their own account credentials for each system, but that approach has major problems. First of all, I’m asking them to place a massive amount of trust in me, a relatively unfamiliar third-party, not to abuse my unrestricted access out of negligence or malice. Second, access to unnecessary authorizations, such as billing information, means a wider potential “blast radius” for any mistake I might make.</p>

<p>My Red Car point of contact already knew how to add new contributor accounts to the Wordpress Admin, but when we got to the web host, they wanted to share the owner’s account credentials. I stopped them and tried to walk them through adding a new account, but the web host (who I will not mention for the sake of client confidentiality) did not make this easy. In an effort to respect their time, I offered a compromise: they would share the owner credentials, I would create a new limited account for myself, and then they would reset the owner’s account password.</p>

<p>This worked out great. After some documentation digging, I was able to grant myself minimal necessary access to the system. <strong>After doing so, I sent over documentation to the client explaining what authorizations I had granted my new user, where they could find this information in the admin panel, and most importantly, how to revoke my access at any time.</strong></p>

<p>This demonstrates two of my core values, transparency and security, working together to build client trust. I want my clients to remain in control of their own data and infrastructure. On top of that, I want to ensure that when I do make a mistake, or if my account is ever compromised, the impact is limited.</p>

<h2 id="safety-first">Safety first!</h2>

<p>My next question was, “do you have a backup of your site?” The answer was no, so I created one for them.</p>

<p>Backups are critical for any website. They are especially important for content management systems like Wordpress where post and page content lives in a database rather than a version-controlled filesystem. Fortunately for me, backing up a Wordpress site is actually quite easy. There are only two major steps to the process:</p>

<ol>
  <li>Archive the static site files into a zip file.</li>
  <li>Dump the database to a backup file.</li>
</ol>

<p>Most web hosts offer graphical interfaces that make this simple. I, being a bit old-school, opted to access the web server over SSH, run my backup commands there, and then copy the files onto my local machine over SFTP.</p>

<p>I made a point of sharing the backup files with Red Car. This seemingly insignificant step reflects another one of my core values: portability. As an end user and consumer, I <em>despise</em> vendor lock-in. For this reason, I don’t want my clients to feel stuck or punished if they decide to hire a different developer in the future.</p>

<h2 id="the-first-obstacle">The first obstacle</h2>

<p>With the site safely backed up, I was eager to start editing content. Immediately, I ran into trouble. I couldn’t even open pages for editing without hitting generic error codes.</p>

<p>Fortunately for me, my client point-of-contact (POC) forwarded me an automated email from the Wordpress server notifying them of the errors. The email contained a link that opened the Wordpress Admin panel in <!-- prettier-ignore-start --><a href="https://www.wpbeginner.com/wp-tutorials/how-to-use-wordpress-recovery-mode/" target="_blank&quot;, rel=&quot;noopener noreferer">Recovery Mode</a><!-- prettier-ignore-end -->
, a feature I didn’t know existed. This helped me diagnose the root cause: an out-of-date plugin. Digging through the plugin’s changelog, I noticed the errors I had seen were marked as fixed in a later version. A quick update did the trick! Now I could actually start editing pages and posts on the site.</p>

<h2 id="project-highlights">Project highlights</h2>

<p>The actual content work for this project touched every section of the site. Many of the updates involved simply inserting or updating text and images, which aren’t the kinds of changes that make for good blog post content. Instead of listing everything I did, Here are two highlights of high-impact work.</p>

<h3 id="improving-the-layout-of-project-profiles">Improving the layout of project profiles</h3>

<p>Red Car has an impressive portfolio of past projects that they are eager to show off on their website. Unfortunately, they lacked a consistent layout for these projects, so information ended up all over the place. When I added some of their newer projects to the site, I invested some time into finding a basic layout that would present information to users in a more organized fashion, and could be re-used for future projects. Below you can see an example of the differences:</p>

<figure class="img-side-by-side">
  <img is="click-to-view" src="/assets/img/blog/client-stories_red-car-site-updates_project-profile-before.jpg" alt="The text and images of the old project profile are scattered underneath the featured image." />
  <img is="click-to-view" src="/assets/img/blog/client-stories_red-car-site-updates_project-profile-after.jpg" alt="The new project profile page presents key bullet points neatly to the right of the featured image." />
  <figcaption class="minor-content">
    Examples of an old project profile (left or top), and a new one (right or bottom).
  </figcaption>
</figure>

<p>Red Car was pleased with this improvement. They actually asked if I could go back and update all of the old projects to match the new layout in a future project.</p>

<h3 id="paring-down-plugins">Paring down plugins</h3>

<p>Wordpress plugins are incredibly versatile and powerful, but they also come with hidden costs. Enabling a bunch of resource-intensive plugins can slow a site down and take up valuable storage space. Even worse, out-of-date plugins can cause site errors or expose security flaws. Typically, the best policy is to only keep plugins your site actively depends on.</p>

<p>At the start of the project, Red Car had around a dozen plugins installed, some enabled, some disabled. By the end, I was able to reduce this number down to four, without breaking any features or losing any data. This was possible due to a careful procedure I followed for each plugin:</p>

<ol>
  <li>Review the plugin’s documentation to understand what it does and how it works.</li>
  <li>Audit the site to identify any and all potential pages, posts, or other features that may depend on the plugin.</li>
  <li>Decide whether the plugin is truly essential to the site.</li>
  <li>If not, remove all dependencies on the plugin. For example, re-build pages so that they no longer rely on the plugin’s features.</li>
  <li>If the plugin is enabled, disable it.</li>
  <li>Test the website to confirm that there are no errors or defects resulting from disabling the plugin.</li>
  <li>Delete the disabled plugin.</li>
  <li>If the plugin really was necessary and I deleted it, restore it from the backup archive.</li>
</ol>

<p>I included a list of all deleted and updated plugins to Red Car in one of my work reports, so that they could reference it if they ever wanted to re-install one.</p>

<h2 id="area-of-improvement-wordpress-development-knowledge">Area of improvement: Wordpress development knowledge</h2>

<p>It’s important to recognize not just success, but also opportunities to improve in future projects. During this project, I learned the basics of Wordpress. However, I was clearly hamstrung during certain tasks by my lack of developer experience with the platform. My unfamiliarity with the architecture and source code meant I couldn’t overcome certain limitations, such as the lack of layout options offered by the active theme. One of my goals over the next month is to become more familiar with the Wordpress internals so I can better serve clients on this popular platform.</p>

<h2 id="final-takeaway">Final takeaway</h2>

<p>This project proves I can offer value-adding services to clients even when I’m unfamiliar with the platform and technologies they are using. I’m grateful for the opportunity to work with businesses like Red Car who are doing great work in the world, and I’m excited to find new clients who share my core values.</p>

<p><strong>Need help with your website? <a href="/contact.html">Contact me</a> today so we can schedule your free consultation.</strong></p>]]></content><author><name>Matthew Cardarelli</name></author><category term="blog" /><category term="client-stories" /><summary type="html"><![CDATA[]]></summary></entry></feed>